Using a laboratory balance (lab scale) is a critical skill in all scientific settings. Even minor weighing errors compromise results. This guide provides a clear, step-by-step Standard Operating Procedure (SOP) to ensure you achieve maximum accuracy and reliability in every measurement.
I. Preparation
Before you even turn on your lab scale, the environment and initial setup are crucial for stability and accuracy.
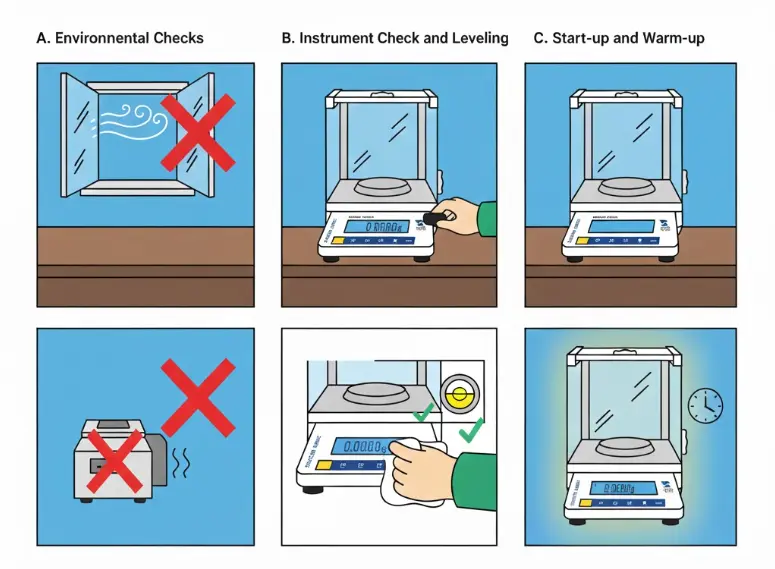
A. Environmental Checks
The location of your analytical balance or precision balance must be carefully managed to prevent environmental interference:
- The surface must be stable, level, and vibration-proof. Never place the balance near heavy machinery or high-traffic areas.
- Check for sources of disturbance: Ensure there are no direct airflow sources (like open windows or air conditioning vents), vibration, or rapid temperature interference.
B. Instrument Check and Leveling
A quick visual inspection and proper leveling are mandatory checks.
- Use the adjusting feet and the built-in spirit level (bubble) to ensure the balance is perfectly level. This is non-negotiable for high-precision weighing.
- Confirm the weighing pan is clean and free from any residue, dust, or spilled chemicals.
C. Start-up and Warm-up
Electronic components require time to stabilize.
- Turn on the lab scale well in advance.
- Ensure a sufficient warm-up time is met—typically 30 minutes to several hours, depending on the model and required precision. This allows the internal weighing cell to reach thermal equilibrium, minimizing measurement drift.
II. Specific Operational Steps
This section details the critical, step-by-step process for obtaining a highly accurate measurement. Precision relies on consistent, repeatable execution.
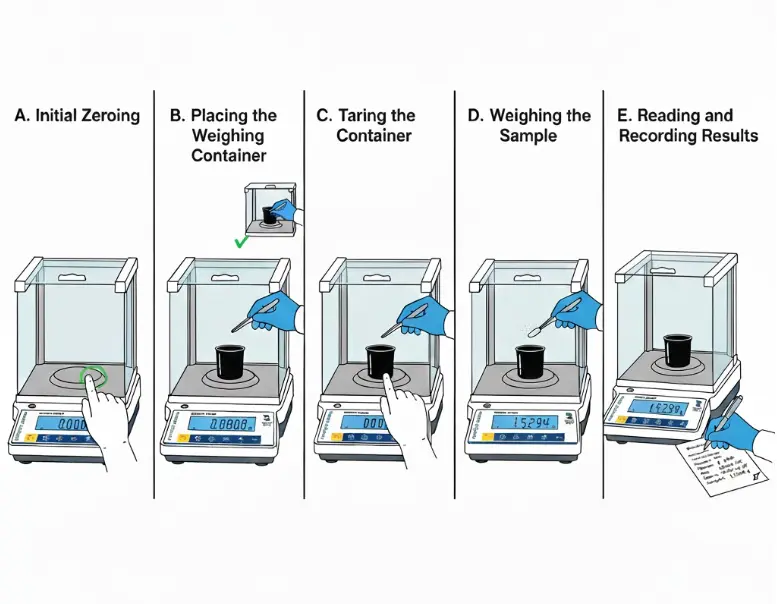
A. Initial Zeroing
- Action: With the weighing pan completely empty, press the “Zero” or “Tare” button.
- Expert Tip: Wait until the zero reading is perfectly stable. This confirms the balance has compensated for minor electronic fluctuations and is ready to start from a clean baseline.
B. Placing the Weighing Container
- Selection: Always use the smallest suitable container to minimize potential surface area for temperature or static effects. Use anti-static containers when necessary.
- Placement: Using gloved hands or tweezers, carefully place the container dead center on the pan.
- Draft Shield Rule: For analytical balances, immediately and gently close the draft shield (and ensure all doors are shut) before proceeding to the next step to prevent air currents from affecting the container’s weight.
C. Taring the Container
- Action: Once the container weight reading is stable, press the “Tare” button.
- Result: The display resets to 0.0000 g. This isolates the measurement to the net weight of the sample you are about to add, which is critical for formulating and dosage accuracy.
D. Weighing the Sample
- Safe Handling: Open the draft shield just enough to access the pan. Crucially: Remove the container from the pan and place it on a stable surface next to the balance before adding the bulk of the material.
- Addition Technique: Using the appropriate spoon or spatula (never fingers), add the material gradually. Approach the target weight slowly, adding the last amounts in minute increments (known as “dosing”).
- Final Measurement: Return the container (now with the sample) to the center of the pan. Immediately and gently close the draft shield.
E. Reading and Recording Results
- Stability Check: Do not record the number until the stabilization indicator (e.g., star or diamond symbol) appears. This confirms the final reading is settled and reliable.
- Documentation Standard: Record the final value and units (e.g., 1.5234 g) immediately. For regulatory compliance (GLP/GMP), this record must also include the Balance ID, Operator Initials, Date, and Time to ensure a complete audit trail.
III. Tips for Minimizing Error
Even perfect technique can be ruined by unseen factors. Use these advanced tips to lock in precision.
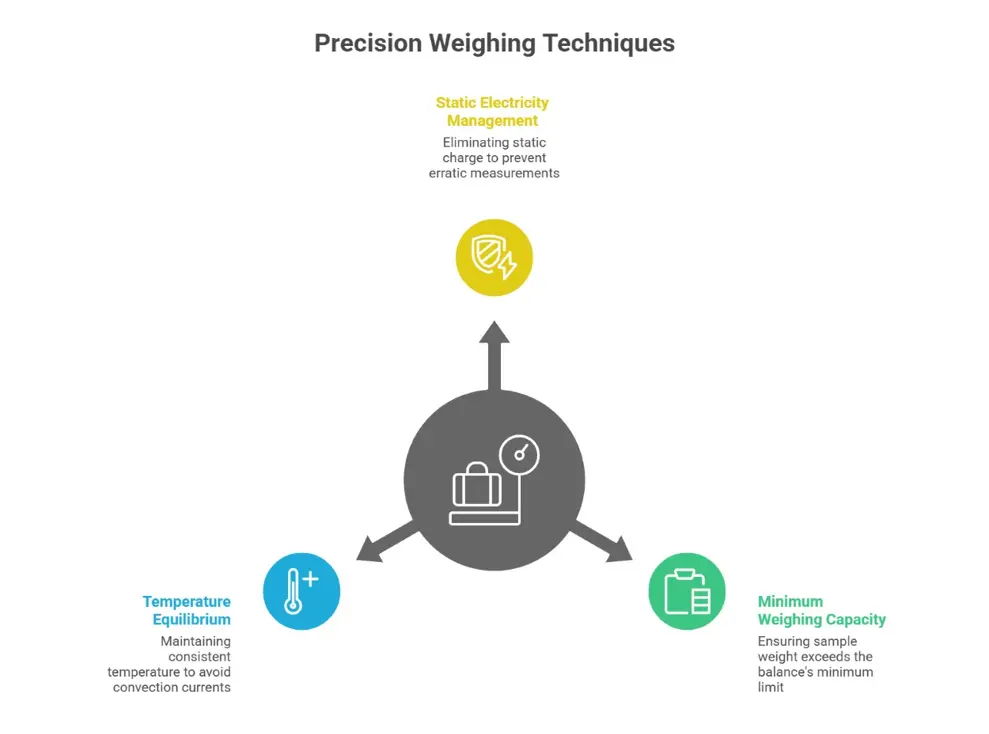
A. Eliminate static electricity
Static charge is a silent precision killer, especially with non-conductive samples (like plastic or powder) in low-humidity environments.
- Identify the effects: Static causes reading drift or erratic measurements as the sample jumps or sticks to the container.
- Solution: Use static eliminators (ionizers) or anti-static containers (e.g., metal dishes) to dissipate the charge before or during weighing.
B. Adhering to Minimum Weighing Requirements
All balances have a measurable uncertainty. The minimum weigh (mmin) is the smallest weight that can be measured while maintaining a specified accuracy (usually 0.1% uncertainty).
- The requirement: The weight of your sample must be greater than the balance’s mmin value. Weighing below this limit results in highly unreliable data that falls outside acceptable tolerances. Always know your instrument’s mmin.
C. Achieve temperature balance
Temperature differences create convection currents, which apply an upward or downward force on the pan, leading to unstable and inaccurate readings.
- Acclimatization: Ensure the sample, container, and balance are all at the same ambient temperature.
- Avoid weighing items with large temperature differences—never place a hot sample directly from an oven or a cold sample from a freezer onto the pan. Allow them to acclimate first.
IV. Calibration and Post-Use Procedures
Proper use extends to maintaining the instrument’s health and validation.
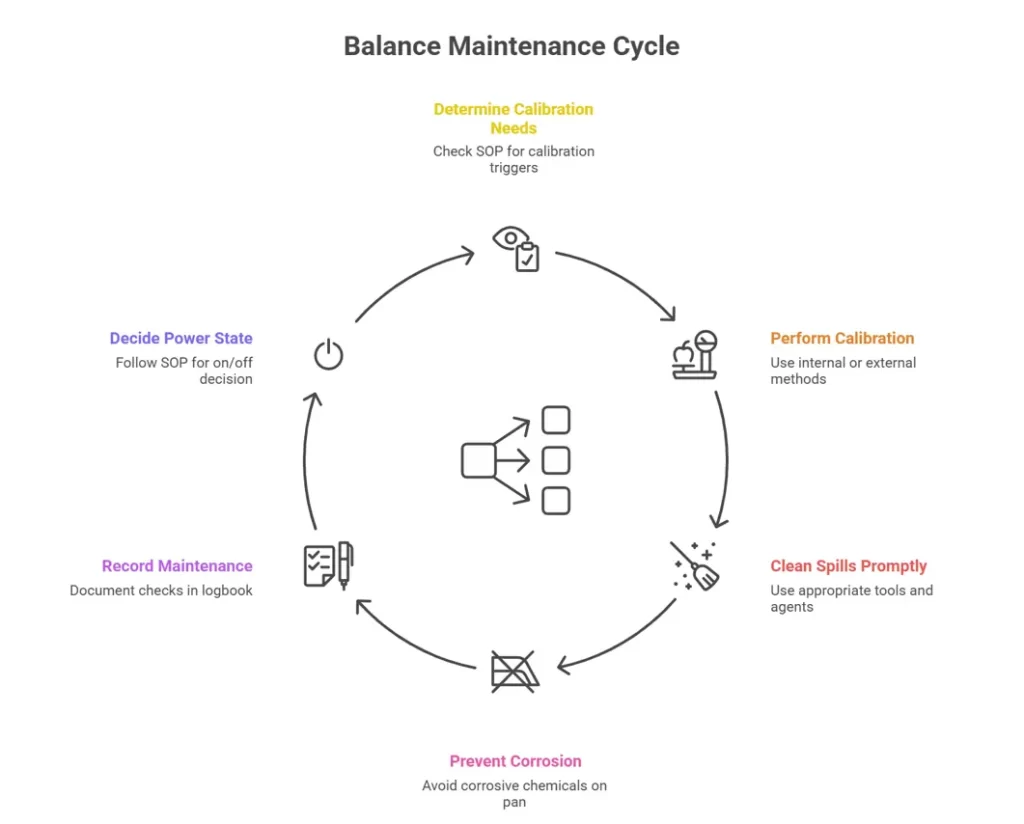
A. Calibration as Part of Use
Calibration is how we ensure the balance’s readings are true.
- Determine when to calibrate: Check your SOP—this is typically required periodically, after the balance is moved, or if the ambient temperature changes significantly.
- Procedure: Initiate internal calibration (if available) or perform the external calibration procedures using certified reference weights according to the manufacturer’s instructions.
B. Post-Use Cleaning
Spills are inevitable; corrosion is not.
- Clean up spills promptly using appropriate tools (like a fine brush) and cleaning agents (often mild soap or isopropanol).
- Focus on prevention: Never let corrosive chemicals sit on the weighing pan or near the instrument’s sensors. Clean thoroughly after every use.
C. Recording and Closure
- Record maintenance information and any spot checks performed in the instrument logbook.
- Decide whether to keep the balance on or off according to the SOP. Many high-precision balances are best kept on to maintain thermal stability.
Conclusion
Mastering your lab scale is about more than just reading a number—it’s about understanding the entire process from environmental controls to post-measurement checks. By integrating these practices, you can dramatically improve the reliability and accuracy of your results, saving time and resources. If you are looking to upgrade your laboratory equipment, Stuccler offers a full range of high-precision analytical and precision balances. Visit the Stuccler website today to find the perfect laboratory balance for your specific application and ensure world-class precision in your work.