Measurement errors drain profitability and invalidate critical data. Proper Balance Calibration is a strict, standardized process. Follow these five simple steps to ensure peak performance.
Step 1: Prepare the Environment & Level the Balance
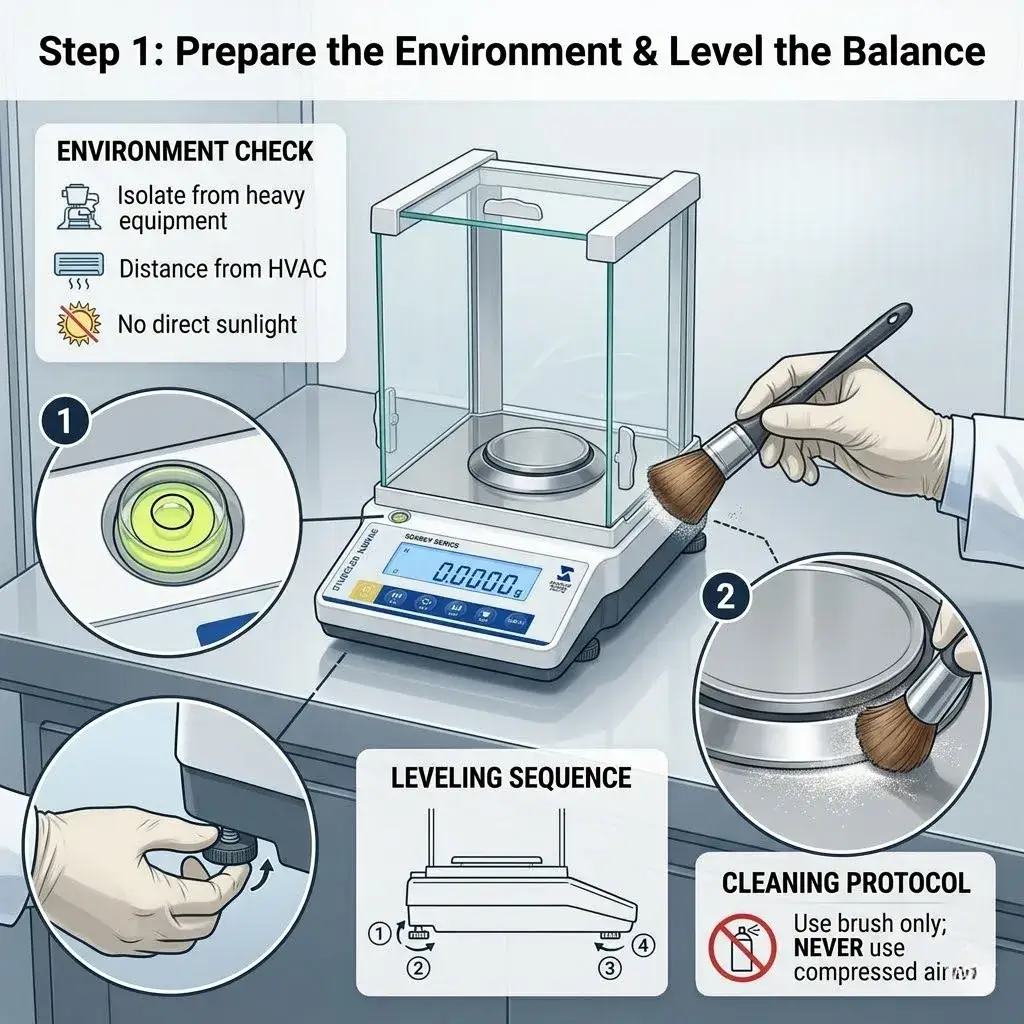
Environmental Hazard Checklist
Your environment heavily dictates your measurement accuracy. Drafts from air conditioners alter the air pressure over the weighing pan. Direct sunlight causes uneven thermal expansion within the load cell.
You must strictly isolate the balance from micro-vibrations. Keep the scale far away from heavy benchtop equipment like laboratory centrifuges or fume hoods. Even invisible vibrations from adjacent workstations easily disrupt the electromagnetic force restoration (EMFR) sensor.
Physical Leveling
An unlevel balance creates immediate corner load errors. Look closely at the spirit level indicator. The air bubble must rest perfectly inside the inner circle. Gently rotate the adjustable leveling feet. Adjust them sequentially until the bubble is dead center.
Cleaning Protocol
Particulate matter ruins your precision. Before calibrating, you must thoroughly clean the weighing chamber. Use an anti-static soft brush. Sweep away all chemical powders or dust. Never use compressed air, as it forces debris directly into the delicate sensor mechanism.
Step 2: Ensure Proper Warm-Up Time
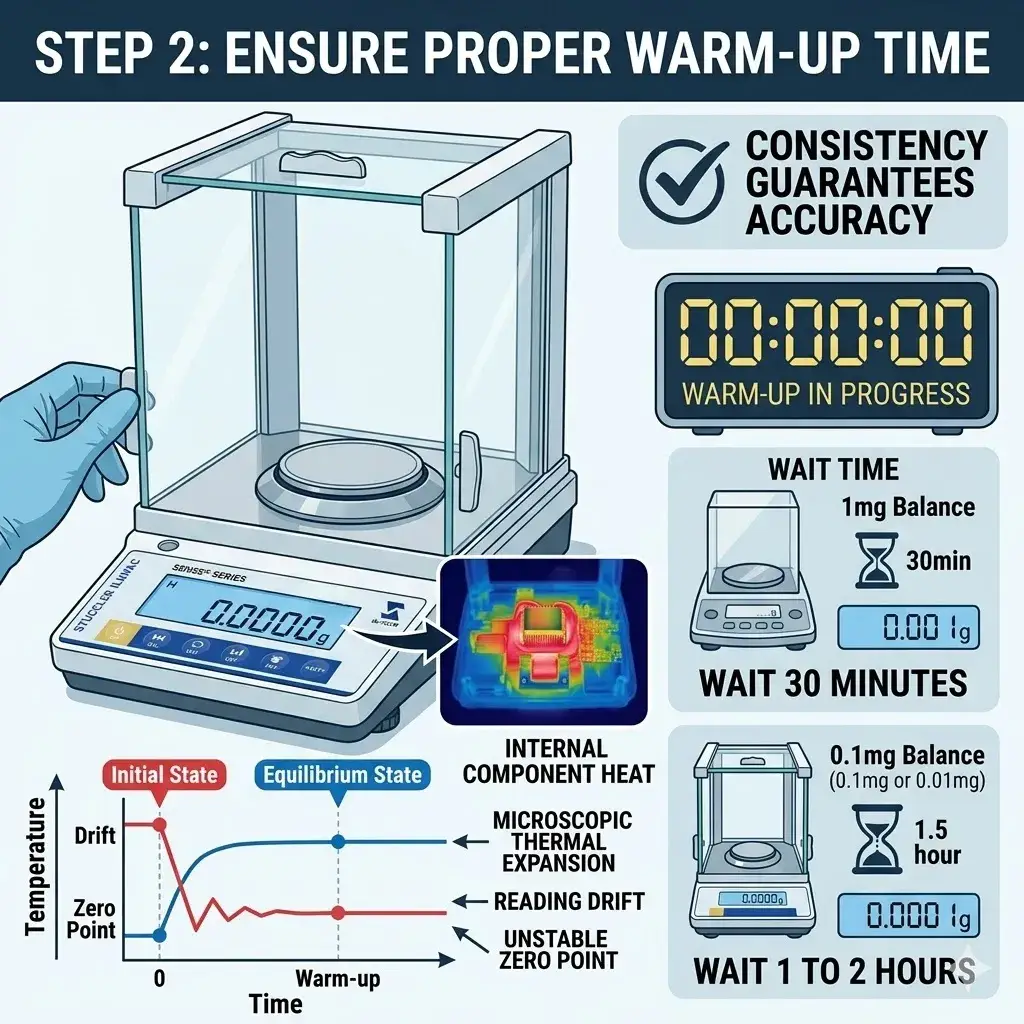
Principle Explained
Why is a warm-up strictly required? Internal electronic components generate heat during operation. This heat causes microscopic thermal expansion inside the weighing cell. If you calibrate before thermal equilibrium is reached, your readings will continuously drift. Your zero point becomes entirely unstable.
Time Recommendations
Never skip this waiting period. Follow strict industry standards for acclimatization. Standard precision balances (1mg readability) need exactly 30 minutes. High-precision analytical balances (0.1mg or 0.01mg) require one to two full hours. Consistency here guarantees accuracy.
Step 3: Zero and Tare the Balance
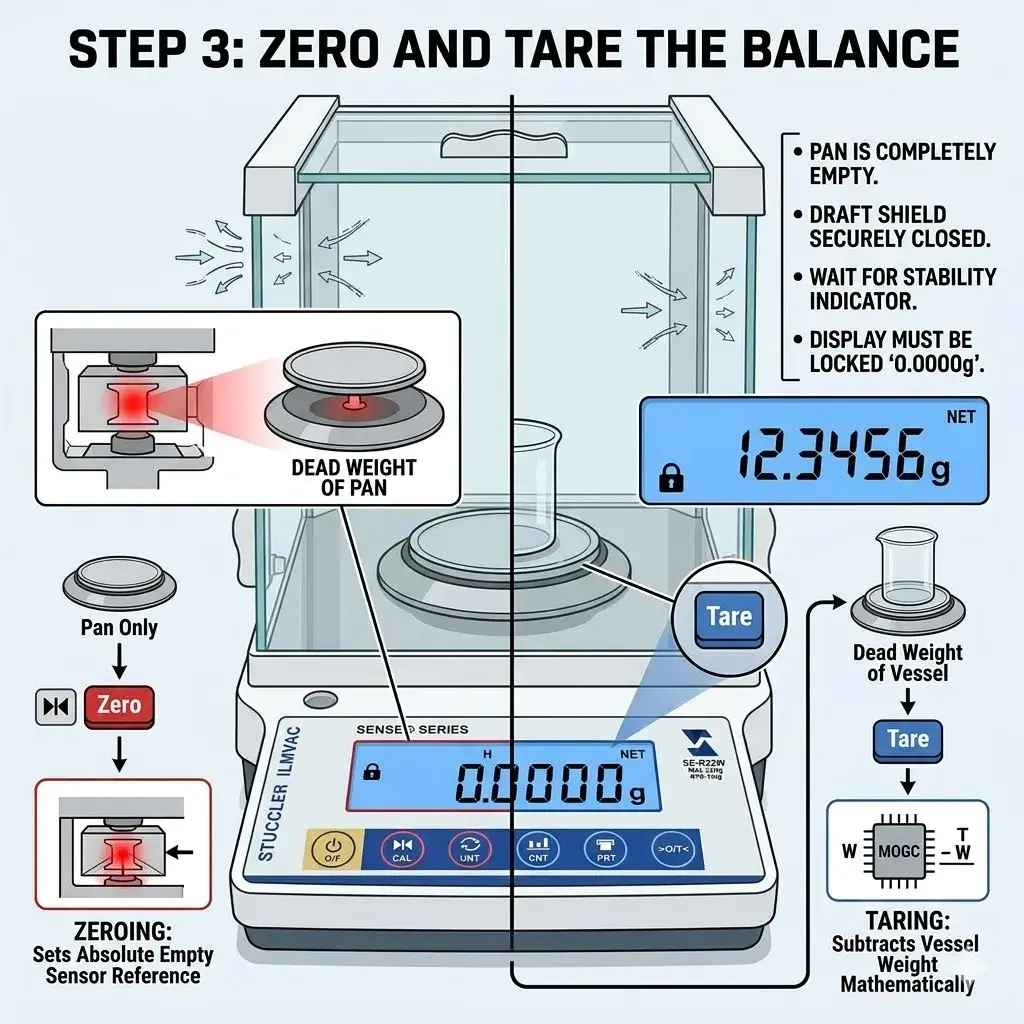
Operational Definitions
Understand the technical distinction between these two functions. “Zero” establishes the absolute starting point for the sensor. It tells the load cell that the pan is completely empty. “Tare” is merely a mathematical offset. It subtracts the dead weight of your weighing vessel from the total mass.
Practical Steps
Empty the weighing pan completely. Close the glass draft shield securely to block air currents. Press the “Zero” key. Wait for the stability indicator to appear. The display must show a locked, stable “0.0000g” before you proceed.
Step 4: Handle and Load Standard Weights Correctly
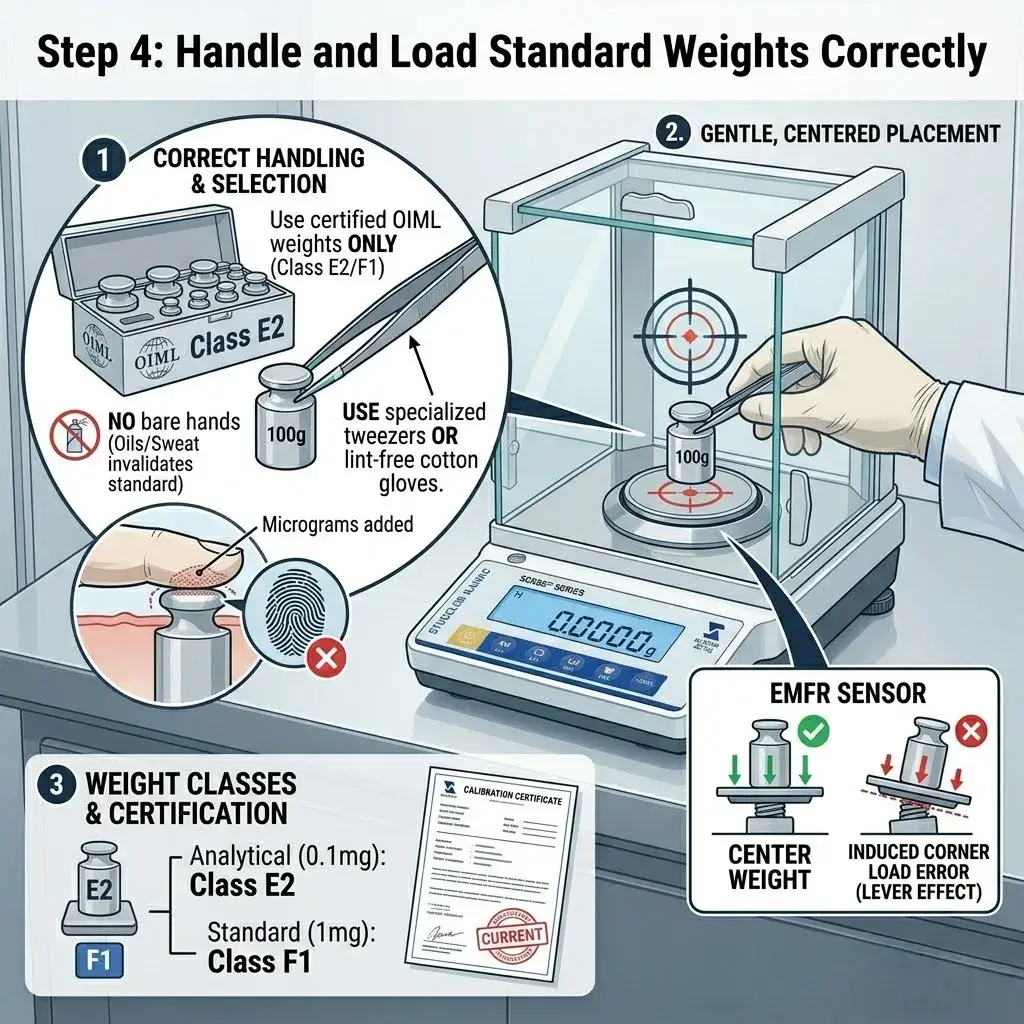
Weight Selection
Never use ordinary heavy objects as calibration substitutes. You must utilize certified OIML calibration weights. Select Class E2 weights for analytical balances. Use Class F1 weights for standard precision models. Ensure your weights have current calibration certificates.
Proper Handling
Never touch calibration weights with bare hands. Human skin contains natural oils, sweat, and dead skin cells. Transferring a single fingerprint adds micrograms of mass to the weight. This permanently invalidates the standard. You must wear lint-free cotton gloves. Alternatively, use specialized non-magnetic, polymer-tipped tweezers.
Placement Technique
Handle the expensive standard weights very gently. Place them precisely in the exact center of the weighing pan. Off-center placement induces a lever effect on the sensor. This creates an immediate corner load error and skews the calibration curve.
Step 5: Execute Calibration and Document Results
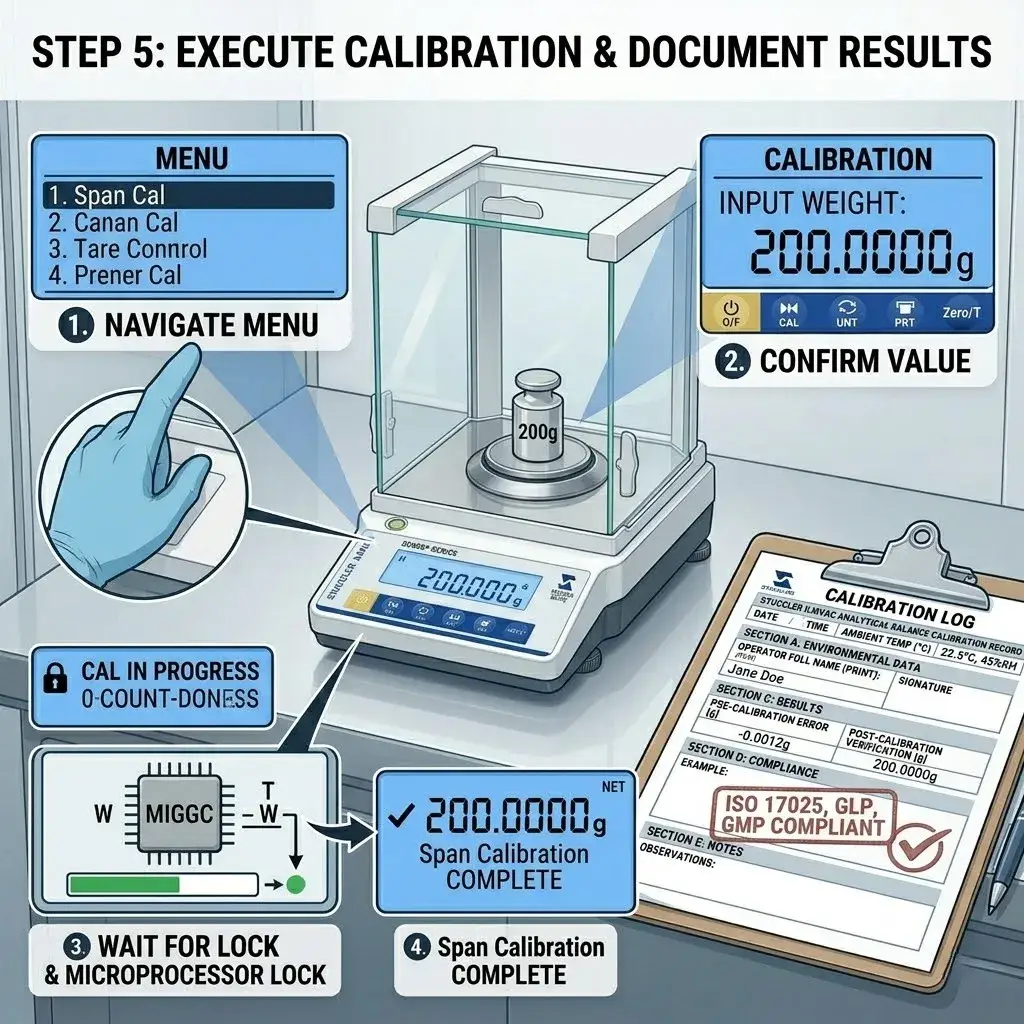
Initiate the Process
Navigate your balance’s internal menu. Select the appropriate “External Calibration” or “Span Calibration” program. Enter the exact value of your standard weight. Launch the sequence. Wait for the microprocessor to lock in the adjustment values.
Compliance Documentation
Proper record-keeping is a legal and technical necessity. Document the exact date, time, and ambient room temperature. Record the operator’s full name. Log both the pre-calibration discrepancy and the post-calibration verification weight. This rigid tracking ensures absolute compliance with ISO 17025, GLP, and GMP standards.
FAQ: Troubleshooting Common Calibration Errors
Why does your calibration process keep failing? Here are the most frequently asked troubleshooting questions.
Q: Why does my balance reading continuously fluctuate during calibration?
A: You likely left the draft shield open. Even microscopic air currents disrupt the sensitive load cell. Always seal the glass doors perfectly before locking in a reading.
Q: Can I use scratched or older standard weights?
A: Absolutely not. Scratches actively remove mass. Rust adds mass. Using damaged weights permanently invalidates your calibration curve. Always use pristine, certified standard weights.
Q: Why won’t my analytical balance stabilize at zero?
A: Static electricity is usually the primary culprit. Plastic weighing vessels easily hold static charges. This creates an invisible magnetic pull on the weighing cell. Use an anti-static ionizer to neutralize the charge immediately.
Q: Does operator breathing really affect measurement accuracy?
A: Yes, significantly. Breathing heavily into the open weighing chamber instantly alters the internal micro-climate. It changes both the temperature and the air humidity. Step back slightly during stabilization.
Q: Why does calibration fail right after I weigh heavy samples?
A: This phenomenon is known as mechanical hysteresis. Leaving heavy loads on the pan deeply stresses the sensor. The load cell requires adequate recovery time. Never calibrate immediately after maximum-capacity weighing.
Conclusion
Routine calibration is not optional. It is the only effective method for ensuring absolute data reliability. Proper maintenance actively extends your equipment’s lifespan. Stop gambling with your critical measurements.
As a direct manufacturer with our own factory, Stuccler engineers analytical balances built for uncompromising industrial precision. We cut out the middleman to provide superior quality control. We proudly support bulk B2B orders for global laboratories. We also provide comprehensive OEM and ODM manufacturing services. Visit Stuccler to upgrade your precision instruments today.