

Have you ever watched your jewelry scale’s digital readout change with the exact same gemstone? In high-precision weighing, a tiny error of 0.01g or 0.001g translates directly to a loss of real profit. Drifting numbers are rarely due to a broken scale, but rather overlooked physical and environmental details. This guide will show you how to eliminate these variables and secure absolutely precise, repeatable readings every single time.
Step 1: Set Up an Interference-Free Weighing Environment
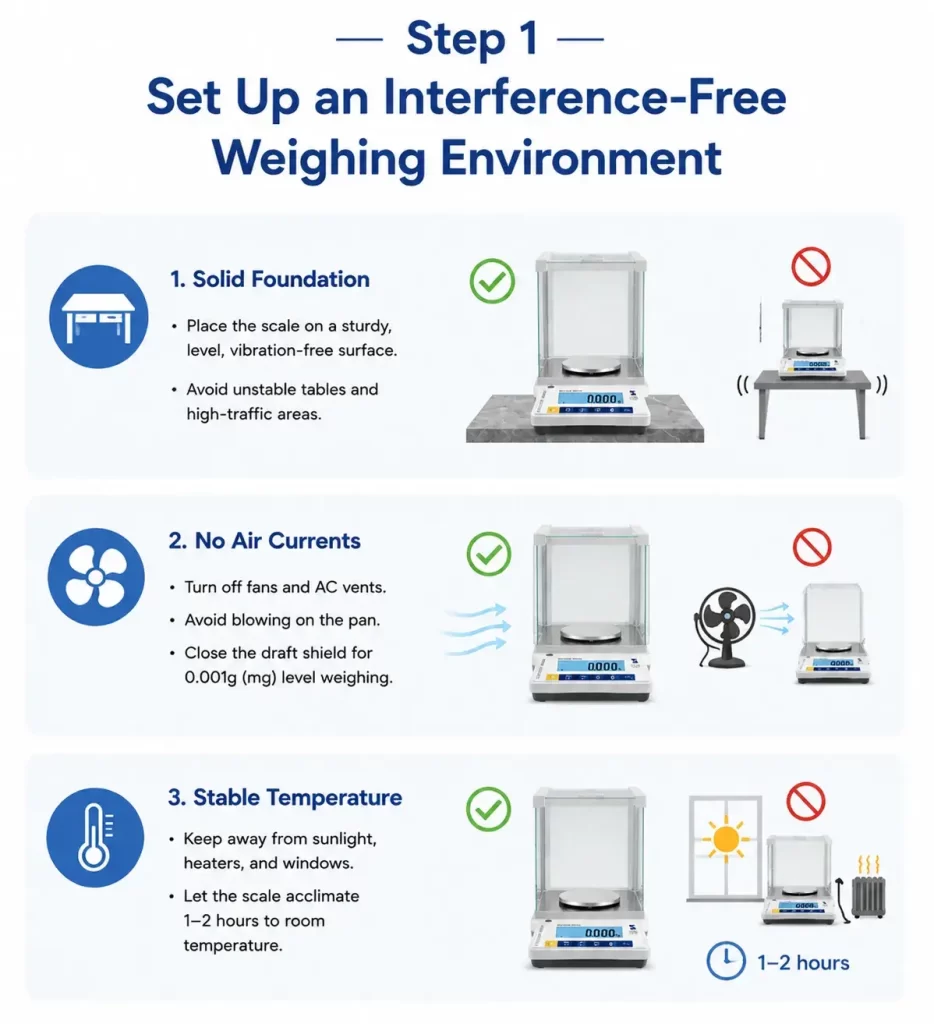
To obtain accurate readings, you must first control the external physical environment. High-precision load cells measure forces so tiny that everyday ambient activity can completely skew your results.
Find a Solid Foundation
- The Problem: Micro-vibrations from footsteps, heavy machinery, or unsteady furniture travel through floors and table legs.
- The Fix: Place your digital jewelry scale on a sturdy, perfectly level, and vibration-free surface. A heavy marble slab or a solid-wood workbench is ideal. Avoid unstable folding tables, thin plastic tables, and areas near high-traffic walkways.
Eliminate Air Currents
- The Problem: Moving air exerts a faint but constant downward aerodynamic pressure on the weighing pan, causing the digits to jump.
- The Fix: Turn off nearby fans, close air conditioning vents, and avoid breathing directly toward the pan. If you are weighing diamonds or precious powders at the 0.001g (milligram) level, always close the draft shield before taking a final reading.
Maintain a Constant Temperature
- The Problem: Metal components inside precision sensors undergo microscopic thermal expansion and contraction when temperatures shift.
- The Fix: Keep the scale away from direct sunlight, heaters, and windows. If you bring a cold scale into a warm shop, let it sit unplugged in the room for 1 to 2 hours to acclimate to ambient temperatures before powering it on.
Step 2: Standardize Every Action During Daily Weighing
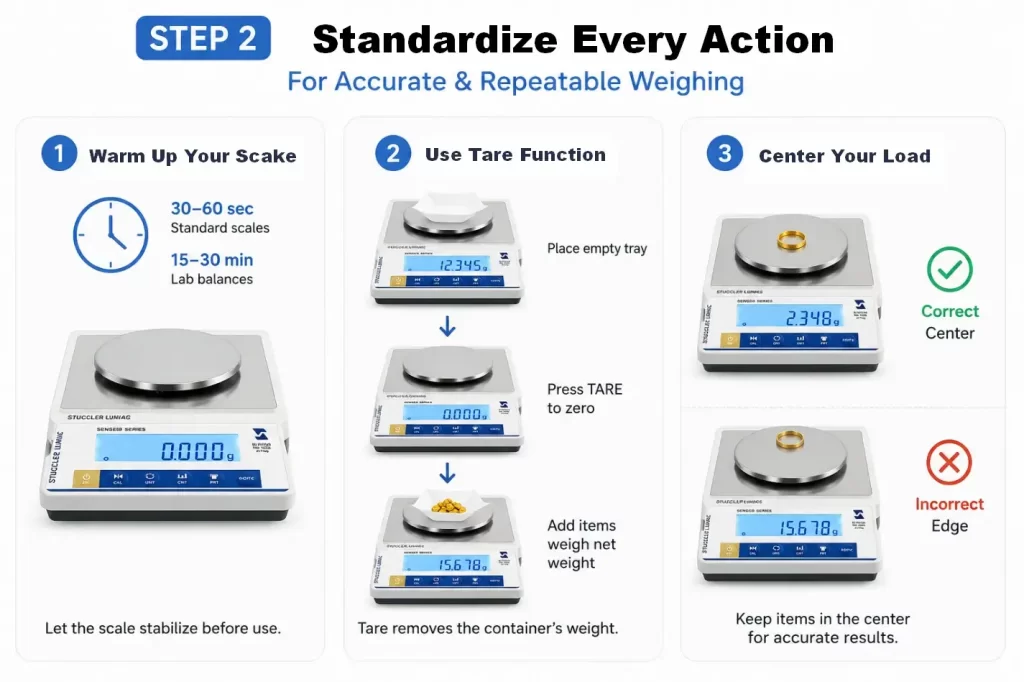
Consistency in how you handle your scale is the secret to getting identical readings every time.
Give Your Scale Time to Warm Up
Just like any sensitive electronic device, a digital pocket scale or carat scale needs its internal circuitry to stabilize.
- For standard jewelry scales: Let the unit sit idle for 30 to 60 seconds after turning it on before placing any weight on it.
- For laboratory-grade balances: Allow a warm-up period of 15 to 30 minutes for the internal electromagnets to reach thermal equilibrium.
Master the Tare & Zero Functions
Confusion between taring and zeroing can lead to math errors. Always place your empty gem tray, scoop, or weighing paper on the pan first. Then, press TARE to reset the display to 0.00g before adding your stones or precious metals. This isolates the net weight of the object and ensures the container’s weight is accurately deducted.
Center Your Load
Placing an object on the edge of the weighing pan causes an uneven torque on the sensor underneath. Always place your gold bars, rings, or gemstones in the exact center of the pan to avoid minor corner-load discrepancies.
Step 3: Perform Flawless Standard Calibration
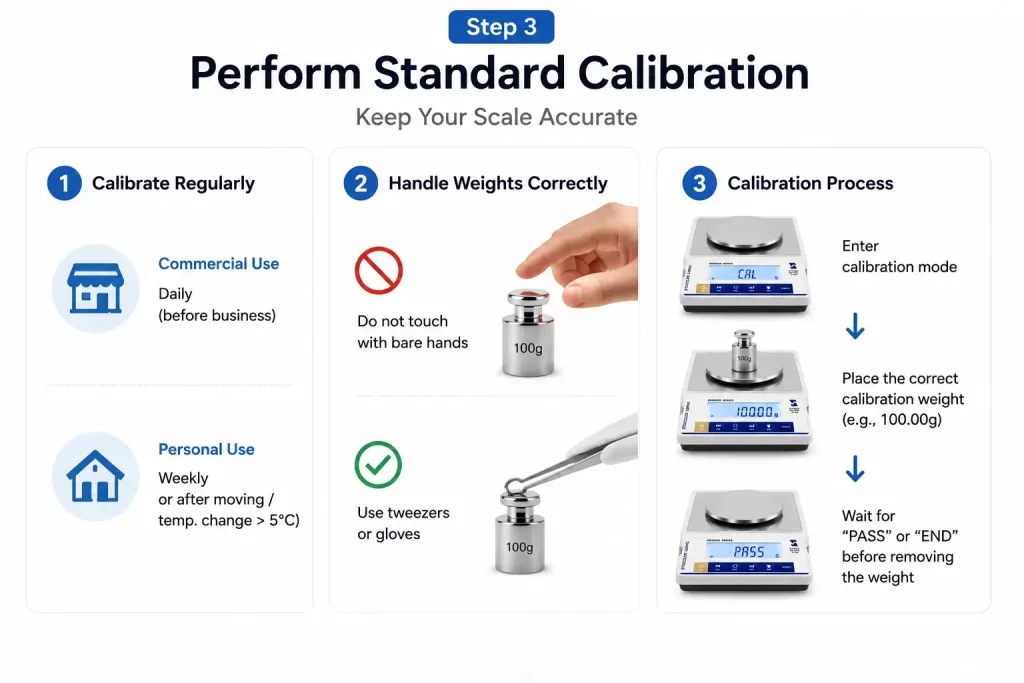
Even the highest-quality digital scale will slowly drift over time due to changes in local gravity, altitude, and component wear. Calibration resets the software’s internal reference point.
Determine Your Calibration Frequency
- Commercial Use: If you run a jewelry retail shop, gold buying business, or laboratory, calibrate your scale once daily before you open for business.
- Personal Use: Calibrate your scale once a week, or whenever you move the scale to a new location or notice a room temperature shift of more than 5°C (9°F).
Handle Calibration Weights with Care
Never touch standard calibration weights with your bare hands.
Warning: The natural oils, sweat, and dead skin cells from your fingertips can add 0.1mg to 0.5mg of invisible mass to a weight. While unnoticeable to humans, this extra weight will permanently ruin your scale’s calibration.
Always use plastic-tipped tweezers or wear clean, lint-free cotton gloves when handling calibration masses.
Execute the Calibration Procedure Correctly
- Ensure the scale is perfectly level and the draft shield is closed.
- Enter the calibration mode (usually by holding the CAL or MODE key).
- Wait for the screen to flash the required weight (e.g., 100.00g).
- Gently place the correct, clean calibration weight in the center of the pan.
- Wait for the screen to display PASS or END before removing the weight.
Step 4: Proactively Eliminate Invisible Sources of Interference
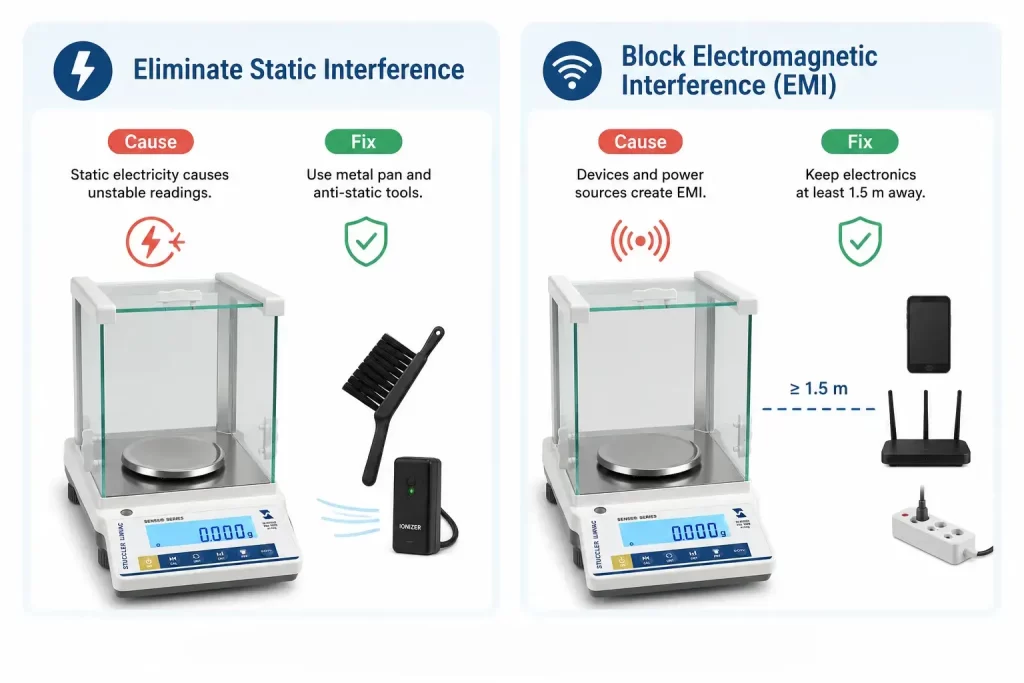
Sometimes a scale’s numbers drift even in a quiet, draft-free room. When this happens, you are likely dealing with invisible electromagnetic or electrostatic forces.
Eliminate Static Interference
- The Cause: In dry climates or air-conditioned rooms, static electricity builds up on plastic weighing pans, gemstone trays, and synthetic clothing. This static creates a physical pull between the pan and the scale housing, mimicking actual weight.
- The Fix: Use metal weighing pans instead of plastic. In extremely dry conditions, pass an anti-static brush over the scale or use a tabletop ionizer to neutralize the charge.
Block Electromagnetic Interference (EMI)
- The Cause: High-frequency waves emitted by mobile phones, Wi-Fi routers, fluorescent lights, and heavy power strips scramble the delicate analog signals traveling from the scale’s load cell to its microprocessor.
- The Fix: Keep all smartphones, tablets, and smart devices at least 1.5 meters (5 feet) away from your scale during operation.
Step 5: Regularly Check and Verify the Scale’s Performance
You do not have to wait for something to go wrong to test your scale’s accuracy. You can run two quick, reliable self-tests in under two minutes:
The Repeatability Test
This test checks if your scale yields consistent results under repeated trials.
- Place a clean coin or a standard weight on the pan.
- Note the reading, remove it, and let the scale return to zero.
- Repeat this process 5 times.
- The variance between the highest and lowest reading should not exceed your scale’s minimum graduation (e.g., ±0.01g).
The Corner Load Test
This test ensures the sensor reads accurately regardless of where the object lands.
| Position | Ideal Result | Action Required if Out of Spec |
| Center | 50.00g (Reference) | None |
| Top (North) | 50.00g (±0.01g) | Calibration / Load cell check |
| Bottom (South) | 50.00g (±0.01g) | Calibration / Load cell check |
| Left (West) | 50.00g (±0.01g) | Calibration / Load cell check |
| Right (East) | 50.00g (±0.01g) | Calibration / Load cell check |
If the readings at the corners show wide discrepancies compared to the center, the internal mechanics of the load cell are likely warped, and the scale needs to be repaired or replaced.
FAQs: Troubleshooting Your Scale’s Accuracy
Q1: Why does my scale’s reading keep drifting or jumping (e.g., 0.005g to 0.009g) when nothing is on it?
This is almost always caused by environmental interference rather than a system defect. Check for invisible air currents from vents, ensure the scale has warmed up for at least 60 seconds, and move all mobile phones at least 1.5 meters away from the unit.
Q2: Can I use any coin (like a nickel or penny) as a calibration weight?
No. Circulating coins lose metal mass through daily wear and tear, and gain weight from dirt and hand oils. Using a random coin to calibrate your digital scale programs a faulty reference point into the microchip, rendering all subsequent measurements inaccurate. Always use certified OIML-standard weights.
Q3: Does temperature affect the accuracy of my jewelry scale?
Yes. The internal components of electronic scales are temperature-sensitive. If you move your scale between areas with different temperatures, let it sit and acclimate for 1 to 2 hours, and then perform a fresh calibration before weighing.
Q4: How do I clean my jewelry scale without damaging its sensor?
Never apply heavy downward pressure to the weighing pan while wiping it down, as this can easily bend and destroy the sensitive load cell underneath. Always turn off the scale first. If possible, remove the metal pan to clean it separately. Use a soft, dry, anti-static brush to sweep away dust or metal shavings.
Q5: What is the difference between “d=0.01g” and “e=0.01g” on a jewelry scale?
- “d” (Readability): The smallest value change the scale can physically display on the screen.
- “e” (Verification Scale Interval): The certified accuracy limit approved by legal metrology departments for commercial trade.
For legal retail transactions, buying, or selling scrap gold, you must use a Class II or Class III “legal-for-trade” scale where the “e” value is officially certified.
Conclusion
Obtaining exact, consistent readings from your digital jewelry scale is not a matter of luck—it is a discipline. By keeping your workspace level, shielding your scale from wind and static, using proper calibration weights, and establishing a consistent routine, you protect your inventory, your reputation, and your bottom line.
Looking for a high-performance precision jewelry scale with windproof and shock-resistant features?
At Stuccler, we are a dedicated jewelry scale manufacturer and supplier, operating our own production factory to maintain the highest quality standards. Whether you need bulk wholesale orders, custom product supply, or tailored private-label (OEM) manufacturing services, we provide the accuracy your brand deserves. Explore our catalog or contact us today to discuss your precision weighing needs.