

When off-center sample placement causes erratic readings, your precision balance is showing an eccentricity (corner load) error. In over 80% of cases, this is caused by external interference or simple misalignment rather than a damaged sensor—meaning it can be fixed on-bench without opening the housing.
Step 1: Establishing a Baseline (Quantifying the Corner Load Error)
Before adjusting settings or cleaning assemblies, document reproducible data to confirm whether the deviation exceeds your unit’s Maximum Permissible Error (MPE).
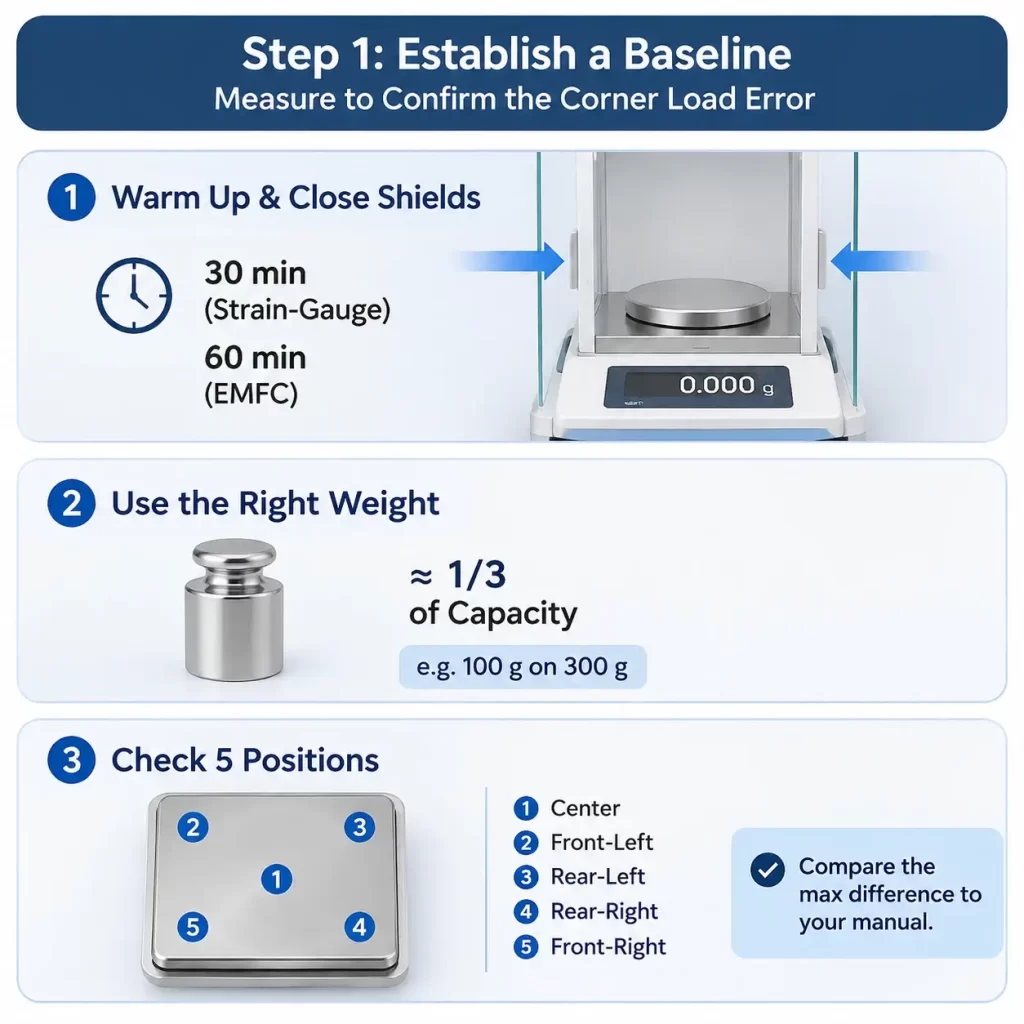
1. Standardize Test Conditions
- Warm-up Time: Power on the device well ahead of testing. Strain-gauge balances require at least 30 minutes to thermally stabilize. Balances driven by Electromagnetic Force Compensation (EMFC) require a minimum of 60 minutes to let the internal magnetic assembly reach operating equilibrium.
- Shielding: Ensure all draft shield doors remain closed between manipulations to avoid air currents distorting your baseline values.
2. Select Appropriate Weights
Never use uncertified or worn test weights for eccentricity testing.
- Use certified weights matching your balance class: Class E2 for high-precision analytical and micro-balances, or Class F1 for standard precision benchtop scales.
- Select a test load roughly equal to one-third (1/3) of the balance’s maximum capacity (for instance, use a 100 g weight on a 300 g capacity balance).
3. Record Center and Corner Readings
Follow the standard 5-point test protocol:
| Position | Location on Weighing Pan | Measurement Order |
| Position 1 | Center | First (Reference Baseline) |
| Position 2 | Front-Left (1/3 distance from edge) | Second |
| Position 3 | Rear-Left (1/3 distance from edge) | Third |
| Position 4 | Rear-Right (1/3 distance from edge) | Fourth |
| Position 5 | Front-Right (1/3 distance from edge) | Fifth |
Re-zero the scale before each placement. Record the stable value for each position and calculate the maximum difference between any corner reading and the center reading. Compare this delta against the tolerance limits in your user manual.
Step 2: Zero-Cost On-Site Troubleshooting (5 Key Physical Factors)
If your baseline confirms an out-of-spec deviation, work through these five external checks before escalating to service teams.
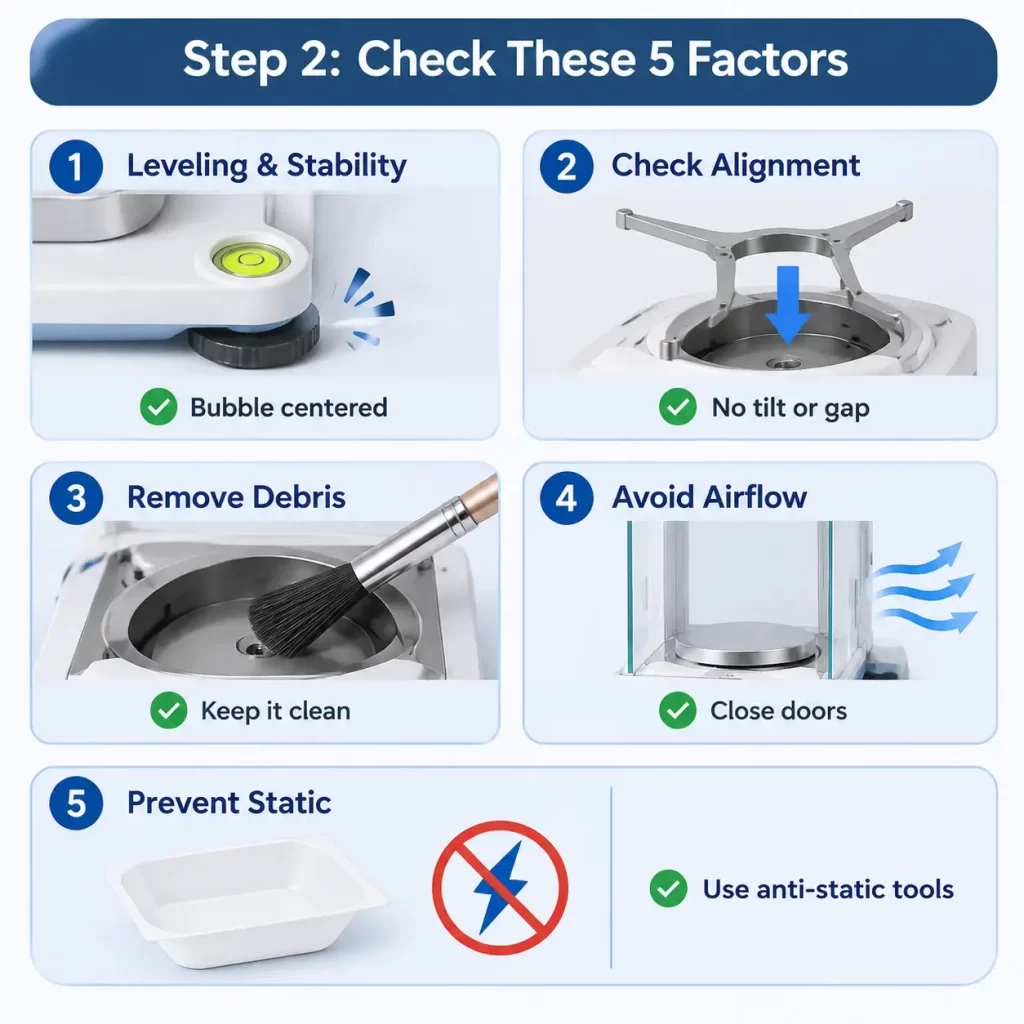
1. Leveling and Surface Stability
An unlevel pan is the primary reason for false corner load errors. When a balance tilts, vertical gravity resolves into lateral vector components across the weighing mechanism.
- Spirit Level Check: Inspect the built-in level bubble. It must sit dead-center in the indicator circle. Adjust the rear and front leveling feet until the bubble centers perfectly.
- Benchtop Stability: Verify that all leveling feet maintain firm contact with the surface. If one foot sits slightly loose, off-center loading causes micro-rocking on the anti-vibration table, registering as an off-center weight discrepancy.
2. Mechanical Interference and Assembly Misalignment
Minor physical misalignments between the weighing surface and the chassis often masquerade as sensor failure.
- Pan Support (Spider) Alignment: Gently lift off the weighing pan. Inspect the three-arm or four-arm support spider underneath. Ensure the positioning pins seat completely in their alignment holes without tilting or play.
- Draft Shield Clearance: Check the perimeter of the weighing pan. There must be a uniform, visible air gap between the pan rim and the base ring or dust collection tray. Even minor contact or rubbing introduces friction when the pan tilts under off-center loads.
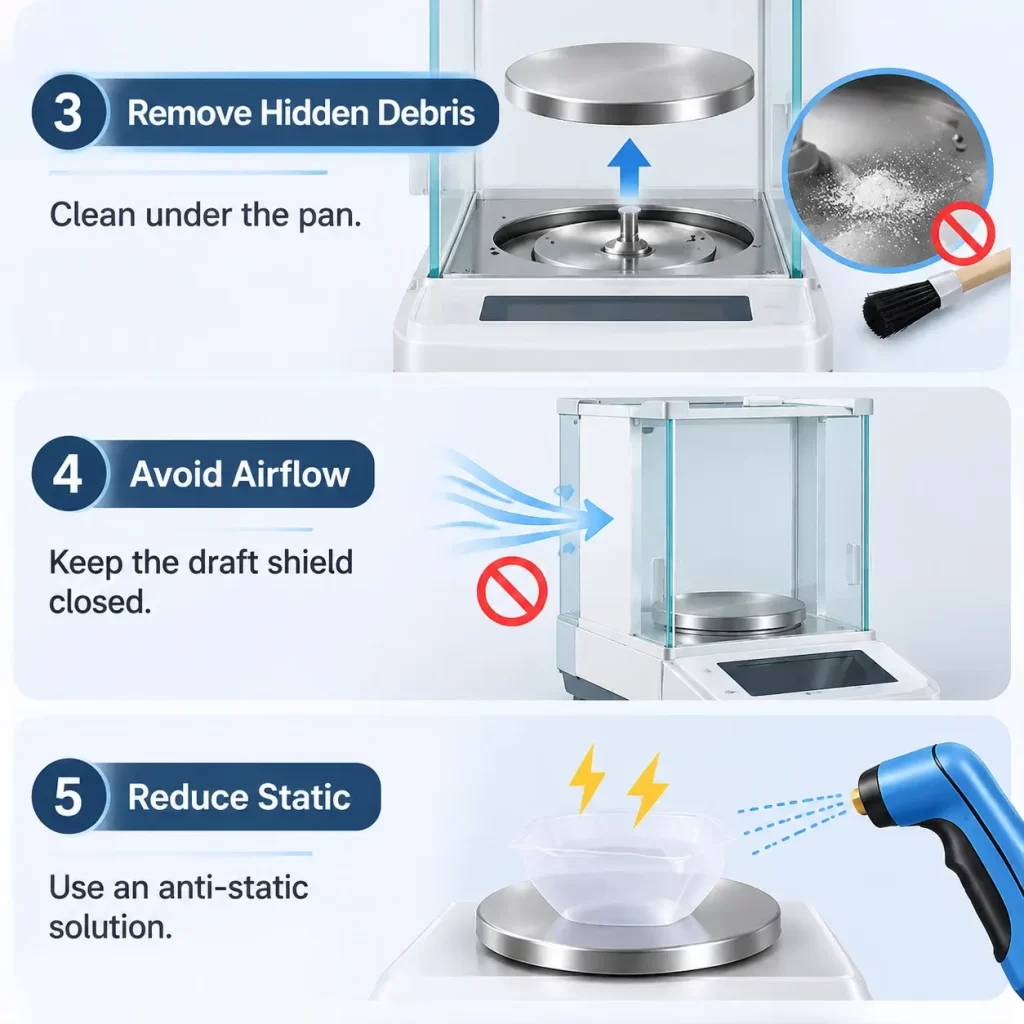
3. Removal of Hidden Debris
Particulate contamination beneath the pan acts as an unwanted lever.
- Remove the pan and spider to inspect the sub-pan cavity.
- Fine powders, chemical crystals, or moisture can bridge the narrow gap between the moving pan receiver and the fixed balance base. When you place a weight on an edge, this debris acts as a secondary fulcrum, redistributing the downward force away from the sensor. Use a soft anti-static brush or a low-pressure laboratory vacuum to clean this area thoroughly.
4. Airflow and Thermal Convection
When placing loads near the edges of the pan, your hand moves closer to the glass panels, introducing localized temperature differentials.
- Opening side doors creates cross-drafts that strike the pan rim unevenly.
- Ensure drafts from overhead HVAC vents, fume hoods, or personnel movement are not directed at the pan perimeter. Always shut the draft shield and wait for the stability indicator symbol (such as an asterisk or circle) to lock in before logging the value.
5. Electrostatic Attraction
Non-conductive vessels (such as plastic weighing boats or borosilicate glassware) carry static charges that skew edge measurements.
- Placing a statically charged container near the perimeter brings it into proximity with the glass walls or metal housing of the draft shield.
- This proximity generates an electrostatic attractive or repulsive force, altering the downward force transmitted to the sensor. If edge readings drift erratically, discharge your containers using an inline static eliminator or anti-static ionizer before placing them on the pan.
Step 3: Manufacturer Software Calibration
If mechanical checks and deep cleanings reveal no interference, internal electronic drift may be responsible.
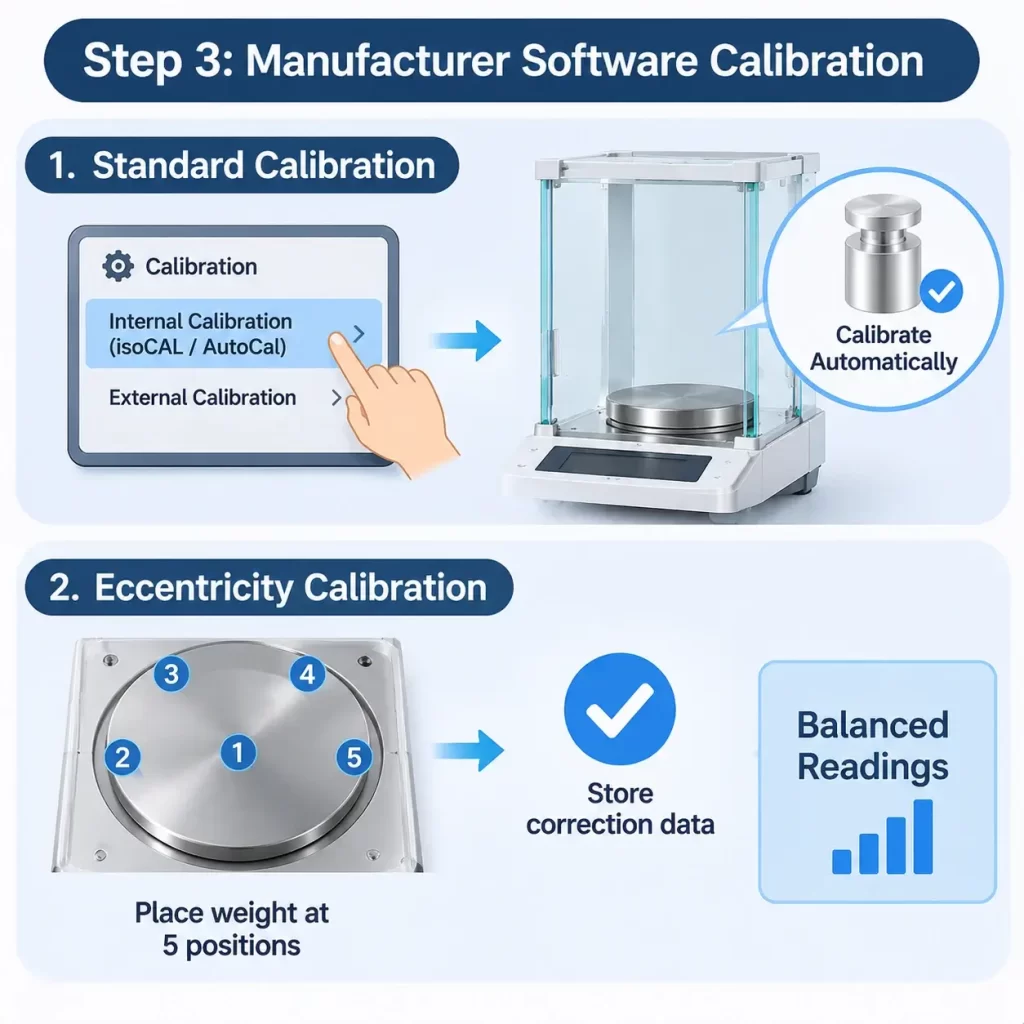
Standard User-Level Calibration (Span and Linearity)
Electronic components drift over time due to seasonal ambient temperature shifts. Run the balance’s routine calibration sequence:
- If equipped with Internal Calibration (isoCAL / AutoCal), trigger the motorized internal weight sequence via the menu.
- If using External Calibration, run a full two-point span calibration with your certified class weights to restore the primary gain slope across the analog-to-digital converter.
Menu-Driven Eccentricity (Corner Load) Calibration
Modern high-precision laboratory balances feature specialized software compensation routines:
- Access the balance setup menu and locate options labeled Service, Calibration Routines, or Eccentricity Adjustment.
- When prompted by the firmware, place your test weight successively on the center, front-left, rear-left, rear-right, and front-right corners.
- The microprocessor calculates individual correction factors for each quadrant, storing digital offset values directly in the non-volatile memory (EEPROM) to balance out minor electrical response variations.
Step 4: Defining the Limit—When to Request Professional Repair

Laboratory technicians should never disassemble the inner chassis or attempt to adjust the transducer assembly. Breaking factory housing seals exposes sensitive flexures to ambient drafts, voids manufacturer warranties, and invalidates ISO/GLP traceability.
Contact an authorized calibration service center or your instrument supplier if you observe the following:
- Persistent Out-of-Spec Error: The corner load deviation remains consistently outside the factory tolerance limits despite completing all leveling, cleaning, and digital adjustments in Steps 1–3.
- Asymmetric Structural Sag: The balance shows crisp repeatability in the center, but readings drop sharply and linearly on one distinct side (for example, reading -15 mg exclusively on the right quadrant). This symptom points to plastic deformation on the internal parallel-guiding flexures, usually caused by dynamic overload or a dropped object.
- Mechanical Binding: You feel physical catching, rubbing, or spring-like resistance when gently depressing the pan receiver with the pan removed.
Building Reliable Weighing Workflows
Resolving a corner load error is primarily a matter of eliminating environmental and physical variables. By following a structured path—measuring baseline drift, re-centering leveling feet, ensuring clean mechanical clearances, and running factory calibration routines—you can resolve most weighing discrepancies directly on your lab bench.
If mechanical damage requires taking an aging balance out of service, consider updating your laboratory with reliable, high-precision weighing hardware. Stuccler is a dedicated precision balances manufacturer and supplier, offering high-performance instrumentation designed for rigorous daily operations. Stuccler provides comprehensive B2B wholesale supply, direct procurement, and custom private-label solutions tailored to distributors, educational institutions, and analytical laboratories worldwide.