In high-precision weighing, a deviation as small as 0.1 mg can compromise pharmaceutical safety, cause costly jewelry discrepancies, and destroy research reproducibility. Based on USP 41 and ISO/IEC 17025 standards, this 6-step SOP eliminates temperature-induced measurement drift to ensure total data integrity.
The 6-Step Standard Calibration Process
Achieving weighing accuracy requires a systematic approach. Skip a step, and your baseline shifts. Follow this structured protocol to ensure your analytical balance remains accurate and audit-ready.

Step 1: Adequate Warm-up Time
An analytical balance relies on delicate hardware. The internal coil of an EMFR (Electromagnetic Force Restoration) sensor requires a constant electrical current. This current generates a stable magnetic field once powered on.
Immediately after powering up, the coil’s temperature is in a state of flux. Calibrating at this stage causes the reference point to physically drift as the temperature rises. Always allow a continuous warm-up period of at least 30 to 60 minutes.
If the precision instrument has been transported over long distances, keep it powered on for a minimum of 4 hours. Ensure the device sits in a dedicated space away from laboratory ovens, direct sunlight, and air conditioning vents.
Step 2: Precise Leveling Adjustment
Physical orientation changes your data. If the laboratory balance is tilted, the gravitational force acting on an object resolves into component forces. Calibrating an un-leveled balance results in an incorrect vertical force value being recorded. This leads to severe off-center loading errors during subsequent procedures.
Look at the built-in spirit level indicator. You must rotate the leveling feet located at the base of the machine. Turn them clockwise or counter-clockwise to perfectly center the air bubble within the inner circle. Once centered, gently tap the weighing pan. Confirm that none of the four feet are suspended or wobbling.
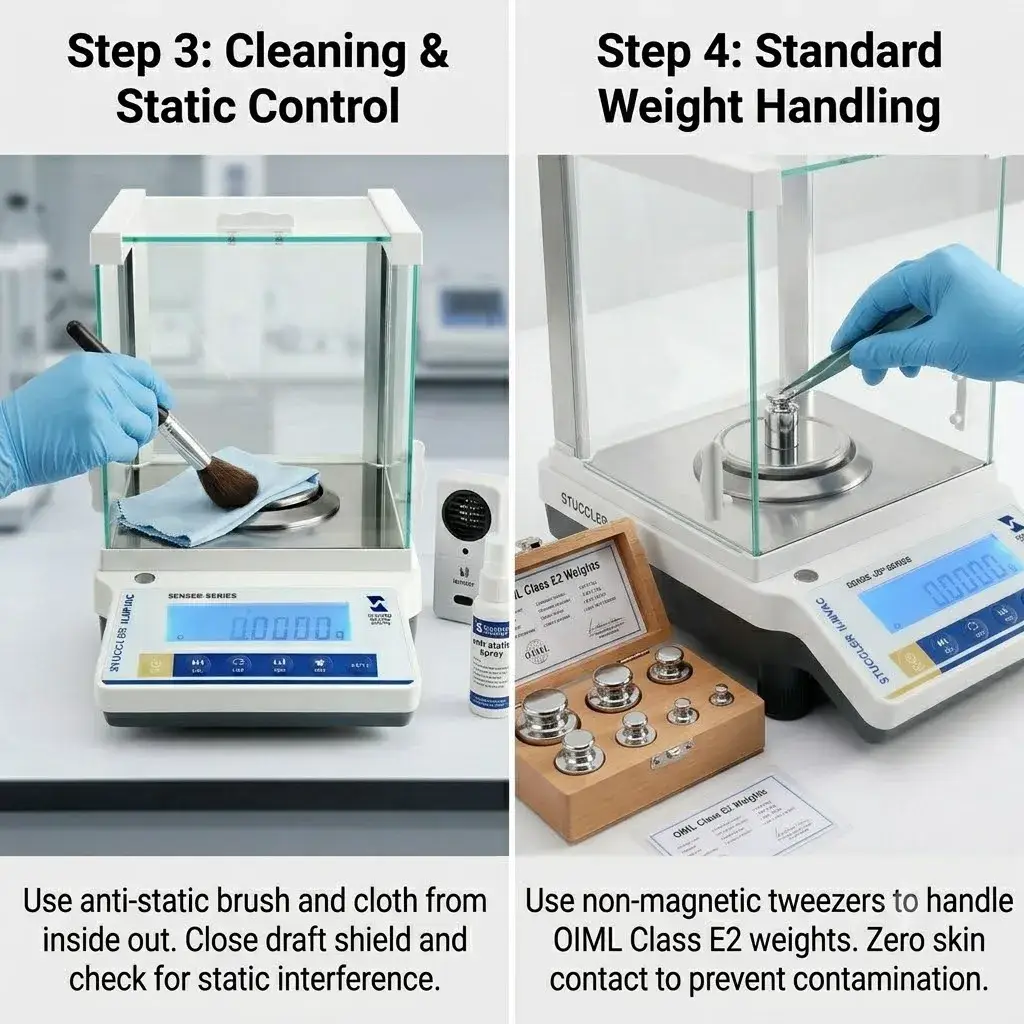
Step 3: Chamber Cleaning and Static Control
Micro-contamination alters your zero point. Dust shifts weighing data. Use a specialized anti-static brush or a lint-free cloth to clean the weighing pan and the draft shield base. Always work from the inside outward. This prevents dust particles from being included in the baseline weight measurement.
Once cleaning is complete, close all glass doors of the draft shield. Faint air currents cause reading fluctuations. Even human breathing can cause a 0.1 mg balance to shift by several digits. Conduct a static charge assessment. Verify that there are no plastic items or dry chemical powders within the chamber. The forces generated by static electricity cause readings to drift continuously.
Step 4: Selection and Handling Protocols for Standard Weights
Calibration requires a certified reference. For an analytical balance with a precision of 0.1 mg, the use of OIML Class E2 international standard weights is mandatory. For laboratory scale models with lower precision, the minimum standard required is Class F1.
Enforce the zero skin contact principle. Under no circumstances should weights be touched directly with bare hands. Natural oils and perspiration on human skin possess a minute mass. Direct contact permanently contaminates the weight’s surface, altering its absolute physical mass. Handle weights using specialized, non-magnetic tweezers featuring an anti-abrasion coating. Alternatively, wear clean laboratory gloves. Allow weights to rest inside the draft shield for several minutes to equilibrate with the room temperature.
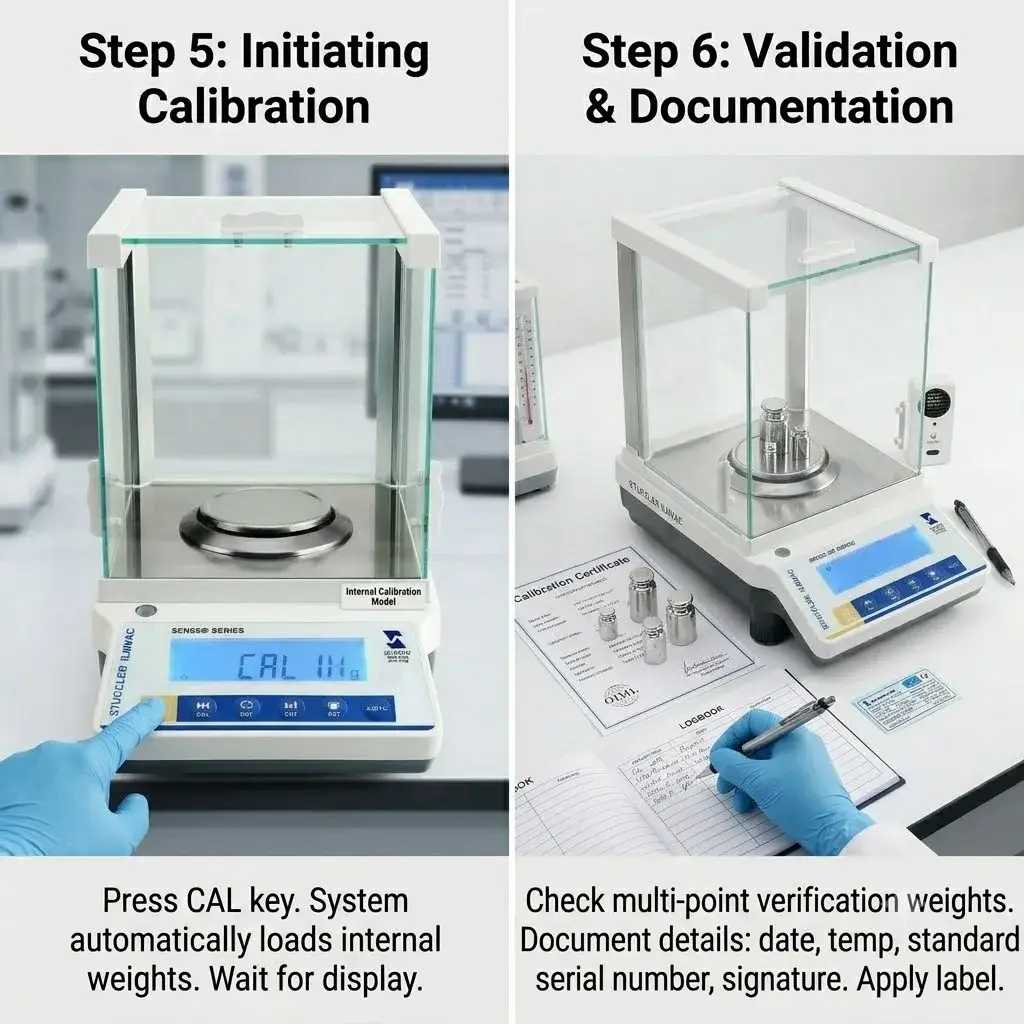
Step 5: Initiating the Calibration Procedure
The execution phase depends on your specific balance architecture. Follow the protocol matching your device hardware.
- For Models with Internal Calibration: Press the CAL key on the control panel. The system activates an internal stepper motor to automatically load the built-in, high-precision standard weights. The display screen will show CAL IN. The entire process requires no manual intervention. Simply wait for the display to indicate SUCCESS or to return to zero.
- For External Calibration Models: Press the CAL key and wait for the screen to flash a specific mass value (e.g., 100.0000g). Using non-magnetic tweezers, vertically and gently place the corresponding external E2-class calibration weight onto the geometric center of the weighing pan. Central placement prevents corner-load errors. Close the draft shield. Wait for the display to stabilize. Once END appears, use the tweezers to return the weight to its storage case.
Step 6: Compliance Validation and Documentation
Calibration must be verified. Do not assume the process succeeded without a secondary check. Perform a multi-point verification check by placing different certified masses on the pan to confirm linearity across the weighing range.
Document the calibration event immediately to comply with ISO/IEC 17025 or GMP guidelines. Record the date, time, ambient room temperature, relative humidity, standard weight serial number, and the technician’s signature. Log files ensure complete data traceability. Finally, apply an updated calibration label to the housing of the balance to indicate its current certified status.
Frequently Asked Questions (FAQ)
Q1: Why does my analytical balance require a warm-up period?
An EMFR sensor contains an electromagnetic copper coil that generates heat when powered. The system needs time to achieve thermal equilibrium. Calibrating without warming up locks in an unstable baseline, causing readings to drift.
Q2: What is an EMFR sensor, and what does it require?
EMFR stands for Electromagnetic Force Restoration. It applies a counter-balancing electromagnetic force to hold the pan in position. Because it relies on magnetic fields, the environment must be completely free from ferromagnetic interference.
Q3: Which class of calibration weights should I choose?
Choose OIML Class E2 weights for analytical balances with a resolution of 0.1 mg or finer. Use Class F1 weights for standard precision balances with milligram resolution. Never use industrial Class M1 weights on analytical instruments.
Q4: What if I accidentally touch a standard calibration weight?
Stop using the weight immediately. Clean it using a lint-free cloth saturated with high-purity anhydrous alcohol. Place the weight inside a sealed desiccator filled with silica gel. Let it dry for 24 hours to restore equilibrium before reuse.
Q5: Why do readings keep drifting after proper calibration?
This indicates environmental interference rather than a calibration defect. Check for micro-drafts from HVAC units, low-frequency structural vibrations from the floor, or static charges on your sample containers.
Q6: What is the difference between internal and external calibration?
Internal calibration uses a built-in motor and a factory-calibrated reference weight inside the casing. It triggers automatically or with one keystroke. External calibration requires the operator to manually place independent, certified weights on the pan.
Q7: How often should an analytical balance be calibrated?
Perform a brief calibration check every single day before making your first measurement. Execute a full 6-step calibration routine if the daily check fails, if the room temperature shifts by ±1.5℃, or if the balance is relocated.
Summary
Maintaining the accuracy of an analytical balance requires rigorous adherence to operational protocols. By controlling warm-up intervals, ensuring precise leveling, managing static charges, and utilizing pristine OIML Class E2 weights, laboratories can fully eliminate measurement drift. Implementing this 6-step standard operating procedure ensures your weighing data stands up to strict ISO and GMP regulatory audits.
Are you looking to upgrade your laboratory hardware or source high-performance weighing equipment? Explore the advanced instrumentation options available at Stuccler. We specialize in supplying premium laboratory balances engineered for demanding industrial and scientific environments. Our corporate team fully supports bulk B2B orders and wholesale distribution across international markets. Contact our application specialists today to request a comprehensive product quotation.