

Maintaining a clean draft shield on an analytical balance is critical for measurement precision, not just aesthetics. Contaminants and haze impair sample visibility, while improper cleaning risks stripping the glass’s delicate anti-static ITO coating. Crucially, excess liquids can seep along the guide rails directly into the sensitive EMFR/EMFC weighing cell, triggering sensor corrosion, short circuits, and zero-point drift.
I. Tools & Solvents for Glass Cleaning
Choosing the correct materials prevents surface abrasion and protects sensitive internal circuitry.
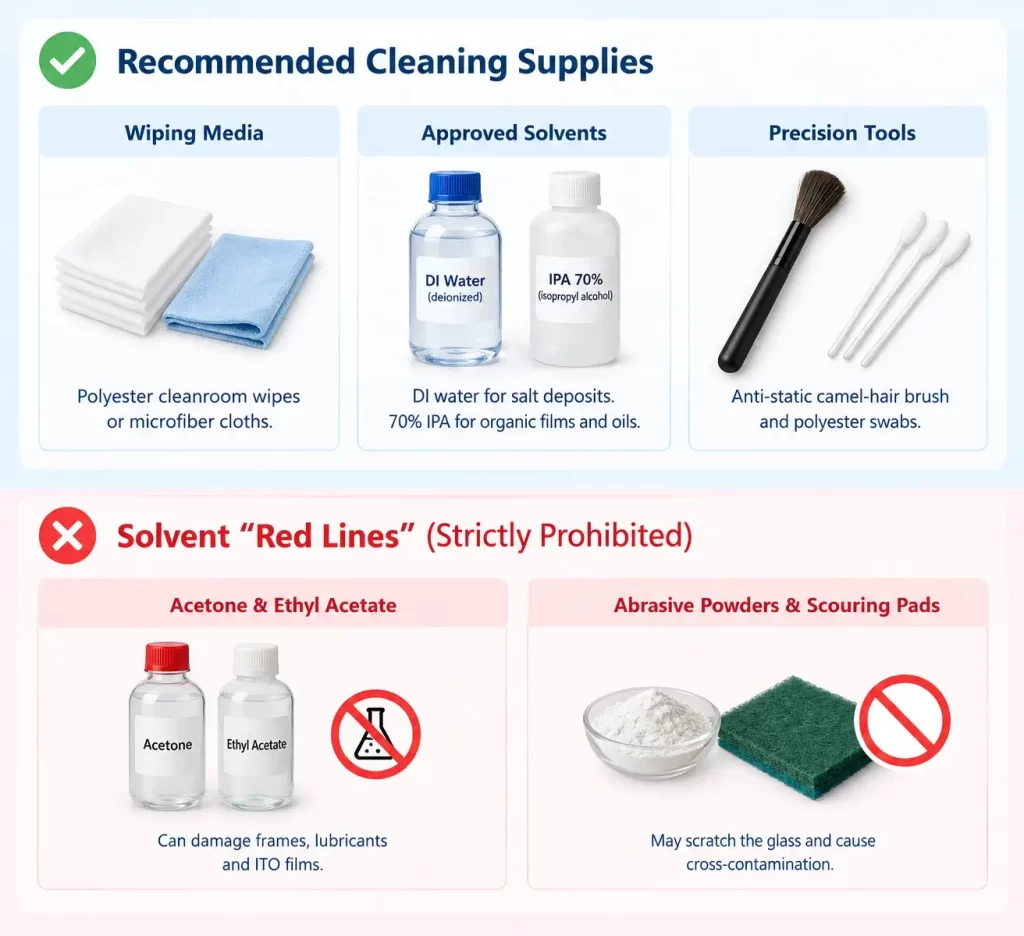
Recommended Cleaning Supplies
- Wiping Media: Dedicated polyester cleanroom wipes (lint-free) or optical microfiber cloths. Standard laboratory paper towels and cellulose tissues shed fibers that trap moisture and generate dust.
- Approved Solvents: High-purity deionized water (DI water) for salt deposits, and analytical-grade 70% isopropyl alcohol (IPA) for organic films and finger oils. IPA evaporates cleanly without water spots.
- Precision Tools: An anti-static camel-hair brush for sweeping dry particulate, alongside polyester-tipped cleanroom swabs for track crevices.
Solvent “Red Lines” (Strictly Prohibited)
- Acetone & Ethyl Acetate: Never bring these solvents near your draft shield. They melt the surrounding polybutylene terephthalate (PBT) or polycarbonate frames, degrade rail lubricants, and strip transparent ITO films instantly.
- Abrasive Powders & Scouring Pads: Abrasive pastes create micro-scratches on optical glass. These microscopic grooves collect stray chemicals, turning temporary spills into permanent cross-contamination points.
II. Step-by-Step SOP for Cleaning Draft Shield Glass
Follow this sequential standard operating procedure (SOP) to safeguard both the balance mechanism and the glass assembly.
Step 1: Sensor Protection and Power Disconnection
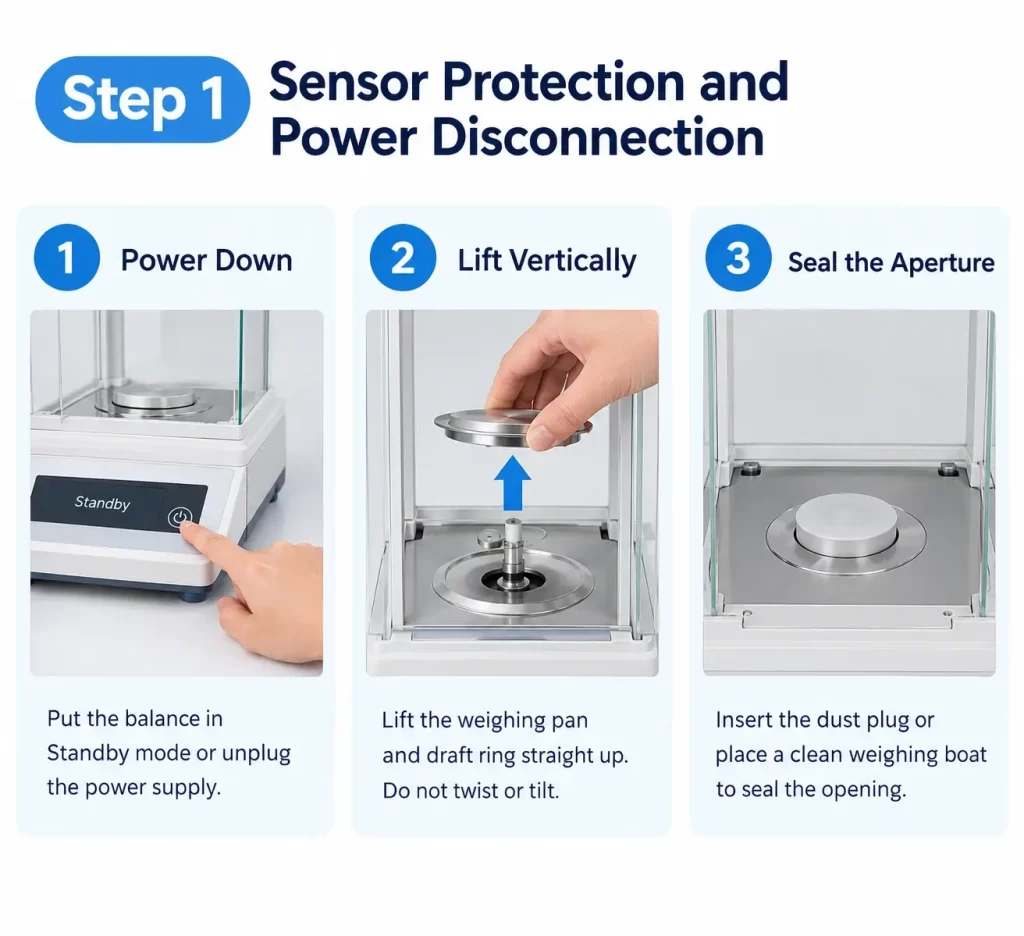
- Power Down: Put the balance in Standby mode or unplug the power supply to prevent erroneous circuit reads and electronic surges while handling the frame.
- Vertical Component Lift: Gently lift the weighing pan and draft ring straight upward along their central axis. Never twist, rotate, or rock the pan sideways, as lateral shear forces can permanently bend the flexure strips inside the EMFR/EMFC load cell.
- Seal the Core Aperture: Immediately insert the manufacturer-supplied rubber dust plug or place a clean, inverted weighing boat over the central pan cone opening. This seals the weighing cell cavity, blocking powders and cleaning mist from entering the sensitive magnetic coils.
Step 2: Dry Pre-Cleaning (Inside-Out)
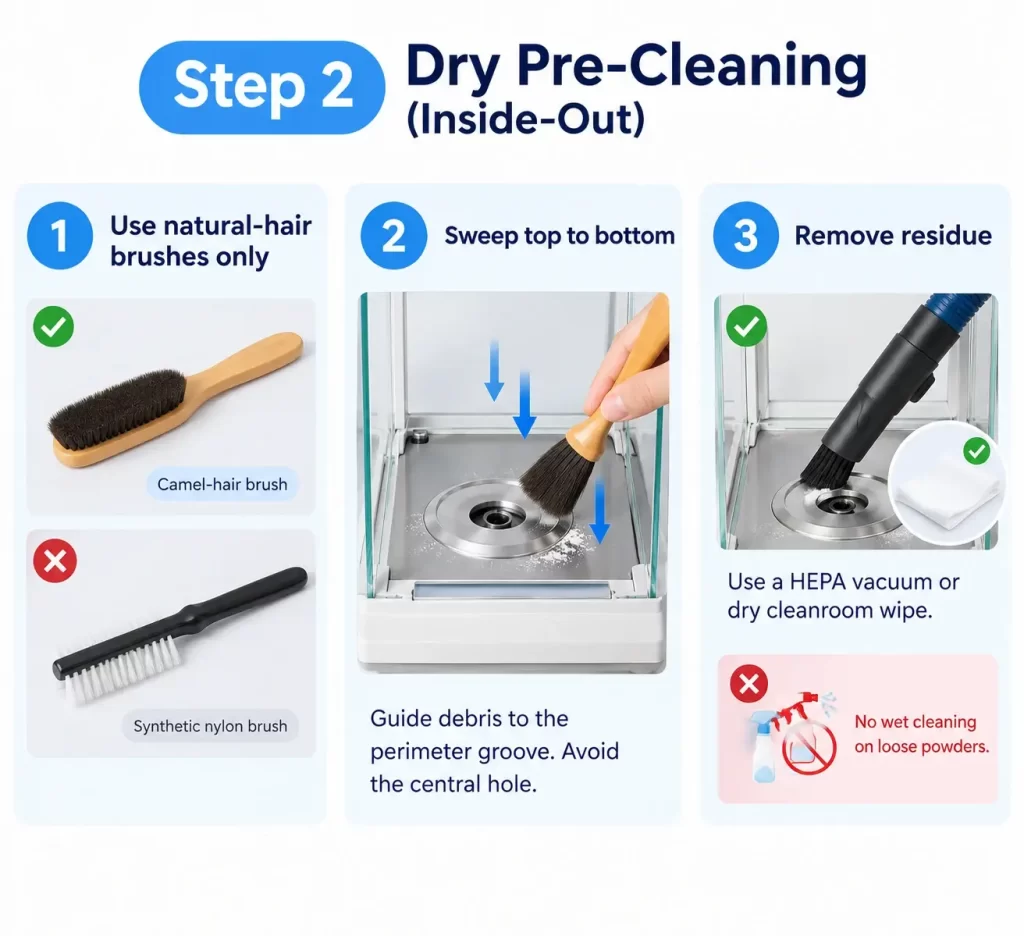
- Natural-Hair Brushes Only: Use a camel-hair or natural-bristle anti-static brush. Never use synthetic nylon brushes, which generate severe triboelectric charges against glass.
- Single-Direction Sweep: Sweep loose powders from top to bottom, guiding debris outward toward the collection perimeter groove. Avoid sweeping across or near the central weighing hole.
- Non-Contact Powder Removal: Collect accumulated dry residue using a specialized miniature HEPA laboratory vacuum nozzle or wipe it gently with a dry cleanroom wipe. Never apply wet cleaning directly over loose powders; moisture turns dry reagent chemicals into a caustic or abrasive slurry that binds inside the panel channels.
Step 3: Safe Disassembly of Draft Shield Glass Panels
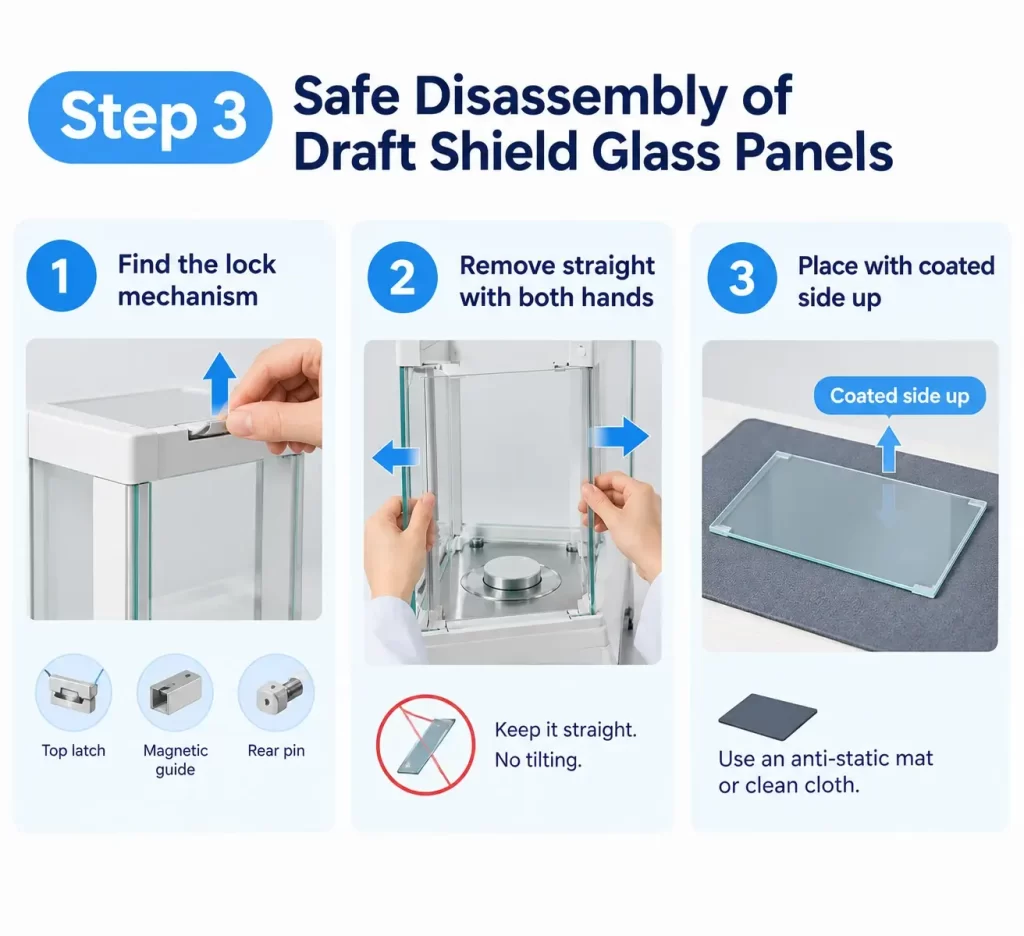
- Identify Lock Mechanism: Disengage the specific retention catch for your model—such as a top quick-release latch, magnetic upper guide, or rear track pin.
- Two-Handed Parallel Extraction: Grasp the glass panel on both vertical edges with equal hand pressure. Slide it parallel to the track guides slowly. Pulling from a single corner or tilting the panel off-axis can bind the slide wheels, crack the edge, or shatter toughened optical glass.
- Coated-Surface Management: High-end panels feature a conductive ITO coating on the interior surface. Always place dismantled glass panes flat onto an anti-static silicone workbench mat or clean lint-free bench towels with the coated (inner) side facing upward to eliminate abrasion risk.
Step 4: Targeted “Overlapping S-Pattern” Damp Wiping
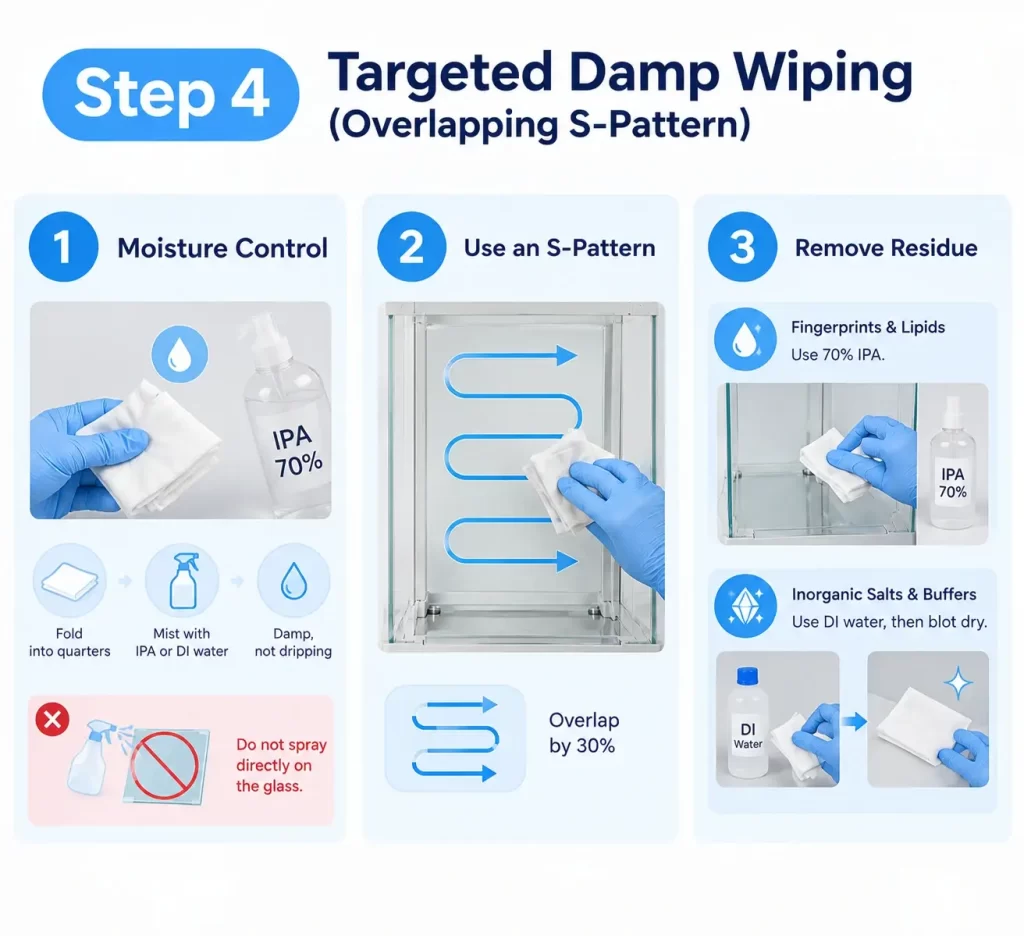
- Moisture Control (The “Two-Cloth” Method): Fold an optical-grade cleanroom wipe into quarters. Mist it once or twice with 70% IPA or deionized water until it feels cool and damp, but not dripping wet. Never spray liquid directly onto the balance glass or frame.
- Overlapping “S” Strokes: Wipe in a steady, continuous “S” pattern from top to bottom, overlapping each linear pass by 30%. Never scrub back and forth or wipe in circular spirals, which smears contaminants and maximizes electrostatic surface charge.
- Targeted Residue Removal:
- Fingerprints & Lipids: Dissolve with a single stroke using 70% IPA.
- Inorganic Salts & Buffers: Use a separate cloth dampened with deionized water to hydrolyze crusts, then instantly blot the area with a dry cleanroom wipe to avoid persistent mineral streaks.
Step 5: Deep Cleaning of Glass Tracks and Sealing Grooves
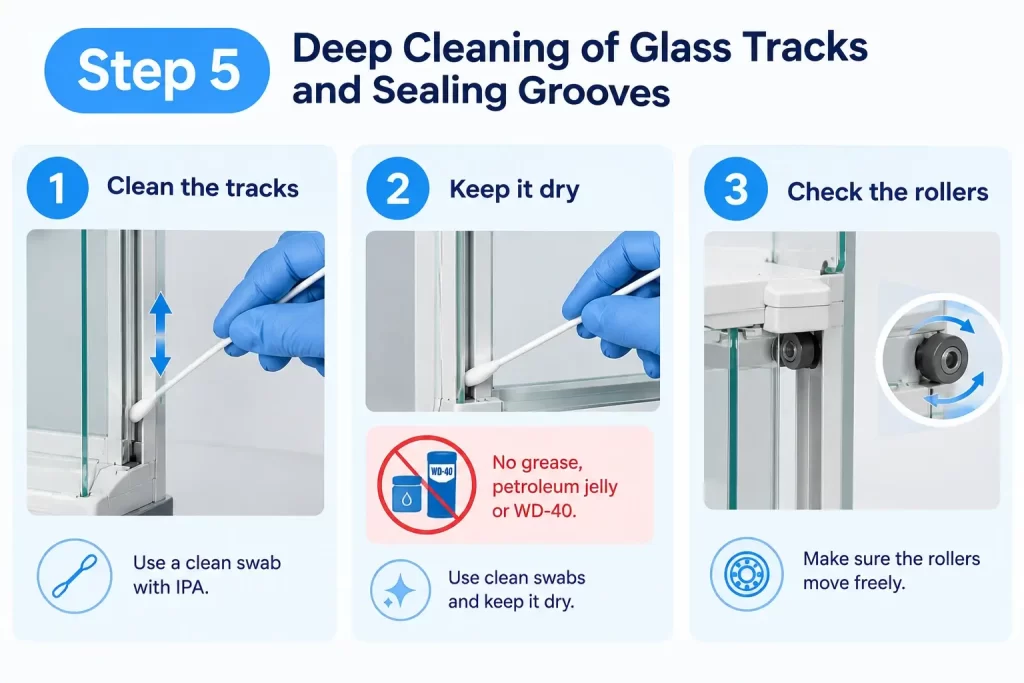
- Recessed Cavity Cleaning: Moisten a rigid, long-handled polyester cleanroom swab with IPA. Insert it directly into the guide rails and slide grooves to dislodge settled particulate, abrasive grit, and powder buildup.
- Dry Lubrication Integrity: Wipe the track dry with clean swabs. Never add petroleum jelly, grease, or WD-40 to the draft shield tracks. Mechanical lubricants rapidly trap airborne dust, turning into a thick paste that seizes sliding doors and introduces volatile organic compounds (VOCs) inside the weighing chamber.
- Damping & Roller Inspection: Manually check door guide rollers and mechanical dampening springs to confirm they rotate freely without friction catches.
Step 6: Panel Reinstallation and Mechanical Alignment
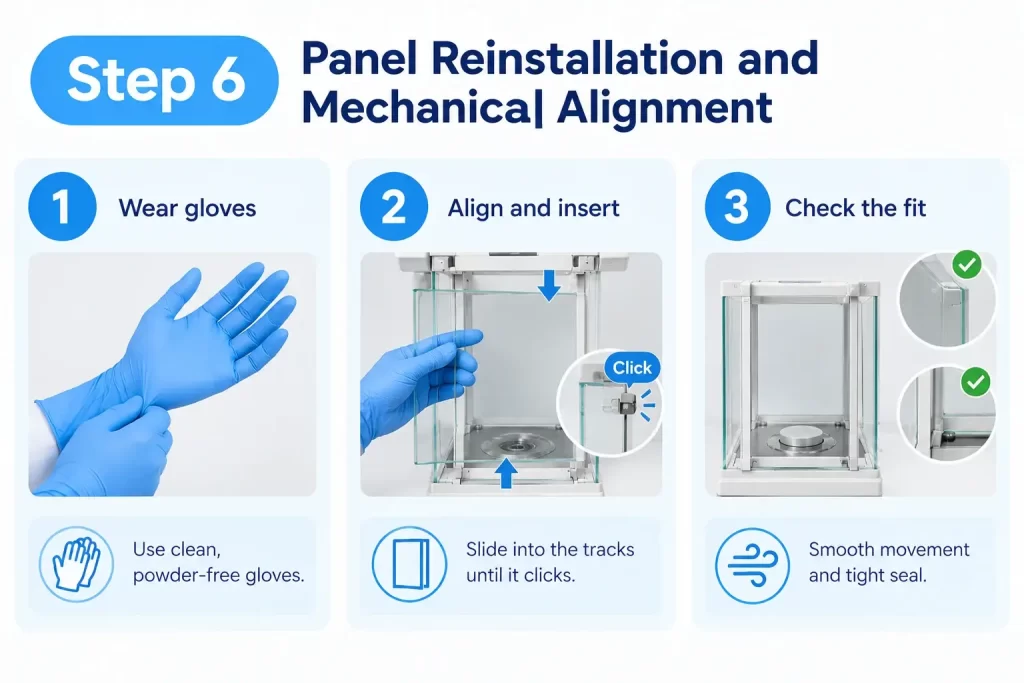
- Glove Protocol: Wear clean, powder-free nitrile gloves to eliminate skin oil transfer to the pristine glass surface.
- Seated Alignment: Align the glass runners within their top and bottom channels. Slide the door home until the retention latch engages with an audible, firm click.
- Breeze-Seal Inspection: Slide each door through its complete travel path to ensure smooth transit and zero mechanical resistance. With the doors closed, check that the overlapping glass edges and rubber seals align flush, preventing drafts and internal air turbulences from disturbing low-milligram readings.
III. Eliminating Static Charges After Cleaning
Mechanical wiping strips electrons from the glass pane. This separation creates surface static potentials that frequently exceed several thousand volts. Because glass acts as an electrical insulator, this static charge pulls or pushes against the metal weighing pan, leading to constant negative drift, floating decimals, or outright measurement refusal.
To clear this charge effectively:
- Targeted Ionization: Point a de-ionizing blower or piezo-electric anti-static gun directly at both sides of the glass panels for 5 to 10 seconds. The balanced stream of positive and negative ions neutralizes surface charges immediately.
- Chassis Dissipation & Rest Period: Close all draft shield panels and verify that ambient humidity sits within an acceptable range (45% to 60% RH). Power on the analytical balance and leave it undisturbed for 15 to 30 minutes. This allows surface charges to drain to earth through the balance chassis grounding network.
IV. Post-Cleaning Inspection & Re-Zero Verification
Confirm operational readiness through a brief verification check:
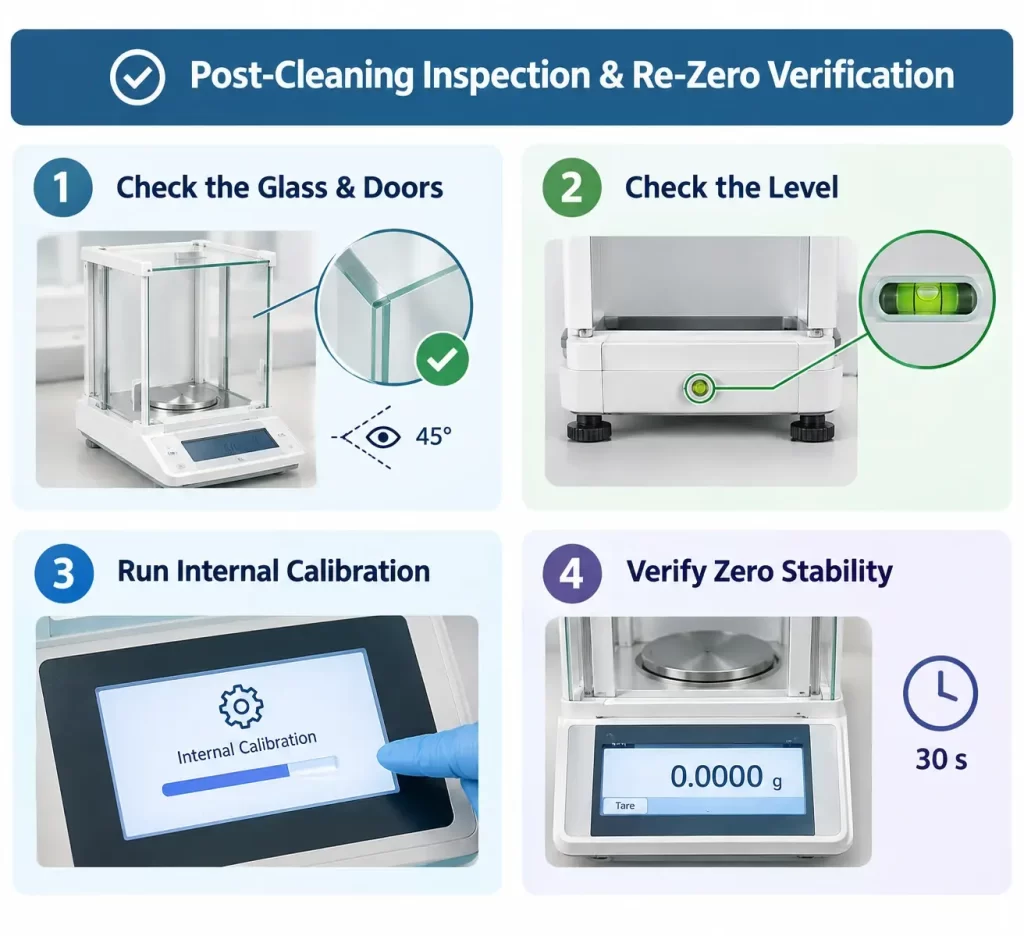
- Optical & Mechanical Inspection: Stand at a 45-degree angle under laboratory lighting to verify that the glass is free from smears, rainbow films, or loose fibers. Confirm that the doors seat flush against their magnetic or rubber travel stops.
- Level Bubble Check: Physical pressure during cleaning can shift the balance feet. Look at the level bubble indicator at the rear of the unit; adjust the leveling feet until the bubble sits dead-center in the target ring.
- Internal Calibration Run: Run the unit’s motorized internal calibration sequence (such as isoCAL or AutoCal) to adjust for small shifts in mechanical posture.
- Zero-Point Drift Test: Zero the balance (Tare), close the draft shield doors completely, and monitor the display for 30 seconds. A stable reading at 0.0000 g confirms that airflow is sealed, thermal equilibrium is restored, and electrostatic interference has dissipated.
V. Routine Draft Shield Glass Maintenance Tips
Consistent care reduces the need for intrusive teardowns:
- Practice “Isolate as You Go”: During day-to-day operations, avoid sliding the draft shield wide open. Open the side panel only far enough (roughly one-third of the travel path) to insert your spatula, weighing boat, or pipette tip. This limits the volume of ambient air, moisture, and particulate entering the chamber.
- Tiered Maintenance Intervals:
- Per Run: Clear visible powder spills around the glass rim immediately using an anti-static brush.
- Weekly: Use a single-direction IPA wipe across exterior glass touchpoints to remove finger marks and airborne dust.
- Monthly or Quarterly: Perform a complete panel removal, deep-clean the track recesses, and execute a full re-zero stability audit.
Elevating Weighing Accuracy with Proper Care and Reliable Hardware
A clean draft shield protects your balance’s resolution down to the sub-milligram level. Proper technique comes down to three basic rules: avoid abrasive materials, keep cleaning solvents out of the lower sensor cavity, and discharge electrostatic fields after wiping.
For laboratories, production facilities, and educational institutions upgrading their weighing infrastructure, hardware design matters just as much as maintenance technique. As a professional analytical balance manufacturer and supplier, Stuccler produces high-precision units engineered with anti-static coated draft shields, responsive electromagnetic force restoration sensors, and easy-clean modular chambers. We provide flexible B2B services, including bulk wholesale orders, custom configurations, and private labeling for commercial distributors worldwide. Explore our catalog or get in touch with our engineering team at Stuccler to discuss tailored weighing equipment for your operations.